Rapid Friday Sale is Live!
Get exclusive discounts on all products
Dec 08, 2025

4 min read

Let's be honest, the biggest hurdle for any new app is getting users through the door. A clunky, multi-step signup form is often where you lose them. This is where integrating a Facebook login for your Android app becomes a total game-changer. It boils the whole process down to a single tap, making onboarding ridiculously smooth and instantly boosting your user acquisition.

Before we jump into the code, it’s worth taking a moment to appreciate the "why." Adding a Facebook login option isn't just a nice-to-have feature; it’s a strategic move that connects your app directly to a global ecosystem. The real win here is the massive reduction in effort it takes for someone to create an account.
Think about it. No more manually typing names, emails, or trying to remember yet another password. That's a huge drop-off point for many users. With Facebook Login, they authenticate with a single click. This isn’t just about convenience—it directly impacts your growth by making that first interaction as seamless as possible.
Modern users have zero patience for friction. A long registration form can feel like a wall, causing people to bail before they even see what your app can do. By implementing Facebook Login, you tear down that wall completely.
This isn't just theory; it's a proven way to grow your user base. The easier it is for someone to sign up, the more likely they are to actually do it and become an active user. For many apps I've worked on, this one change led to a very real and measurable lift in signup conversions.
By tapping into Facebook's established user identities, you offload the burden of account creation and password management. This frees up users to engage with your app's actual value proposition immediately.
To really drive this home, let's break down the core benefits you're getting with this integration.
| Benefit | Impact on Your App |
|---|---|
| Drastically Reduced Friction | Users sign up with a single tap, leading to higher conversion rates from the get-go. |
| Access to Richer User Data | With permission, you can get verified names and emails for instant personalization. |
| Increased Trust and Security | Users often feel safer logging in with a familiar platform than creating a new account. |
| Simplified Onboarding Flow | You can skip tedious steps like email verification, getting users into the app faster. |
| Massive User Base Reach | You're connecting to billions of active users, many of whom are already on mobile. |
Each of these points contributes to a stickier, more engaging user experience right from the start.
The sheer scale of Facebook's mobile user base is hard to ignore. By 2024–2025, an estimated 81.8% of Facebook users were accessing the platform only on their phones. This mobile-first behavior makes an android login with facebook incredibly relevant. You're meeting users right where they are.
This direct connection gives you a few key advantages:
This approach works wonders across different frameworks, too. You can see how powerful social logins are by checking out these React Native app examples that use them to drive serious engagement.

Before you even think about writing a single line of code, your first stop is the Meta for Developers portal. This is your command center, the place where you forge the connection between your app and Facebook's authentication system. I can't stress this enough: getting this part right is absolutely critical. A tiny mistake here is the number one reason I see developers pulling their hair out over login failures down the road.
First thing's first, you'll create a new app. This process spits out your unique App ID. Think of it as your app's passport—it's how Facebook knows who's knocking at the door every time a user tries to sign in. You'll need to drop this ID right into your Android project, so keep it somewhere safe.
Once you've got your app shell created, the real work begins. You have to tell Facebook exactly which Android application is allowed to use this login. This boils down to two key pieces of information: your app’s package name and a security signature called a key hash.
The package name has to be a perfect match for the applicationId in your build.gradle file. I mean perfect. A single typo will bring the whole authentication flow to a grinding halt. This detail is non-negotiable; it's what ensures only your genuine app can kick off a login request.
Next up is the key hash. This is a unique, 28-character string generated from the signing certificate you use to build your app. It’s like a cryptographic fingerprint, proving to Facebook that the login request is actually coming from an authentic build of your application.
I’ve seen this trip people up countless times: they only provide the debug key hash during development. Don't forget to generate and add a separate release key hash from your production keystore before you publish. If you skip this, the android login with facebook will work flawlessly in your tests but will fail for every single person who downloads it from the Google Play Store.
With your Android platform configured, you need to decide what information you're going to ask the user for. By default, every Facebook Login gives you access to a user's public_profile. But let's be honest, most apps need their email address at a minimum.
To get it, you have to explicitly add the email permission right in your App Dashboard. This makes sure the user is prompted to approve sharing their email address on the consent screen.
These are the essentials to get you started:
public_profile: Gives you a user's name and profile picture. This one is granted by default.email: Lets you grab the user's primary, verified email address. You have to specifically ask for this.If you need more sensitive data, like a user's friend list or their birthday, you’ll have to submit your app for review. Be prepared to clearly justify why your app needs that specific data to function.
Finally, the last step in the portal is flipping the switch on your app from "Development" to "Live" mode. While in development, only designated admins, developers, or testers can use the login—a perfect sandbox for getting everything right. Going live opens the floodgates and makes your integration available to the public, officially completing the portal setup.
If you're working directly in Kotlin or Java, the official Facebook SDK is your best friend for an android login with facebook. This is the most direct path, giving you fine-grained control over the entire login flow, from the first button tap to handling the final result.
First things first, you'll need to pull the SDK into your project. Just add a single dependency line to your app-level build.gradle file. This one little addition brings in all the machinery you need to talk to Facebook’s servers. It’s a simple but non-negotiable step to get everything wired up.
Next up is your AndroidManifest.xml file. This is where you formally introduce your app to Facebook. You’ll need to pop in a few key meta-data tags, most importantly your Facebook App ID and the client token. This configuration tells the Android OS exactly how to hand off the authentication result from the Facebook app (or a web view) right back to your application. Get this wrong, and the login will just hang in limbo.
With the project configured, it's time to write some code. The whole process really boils down to two key pieces: the CallbackManager and the LoginButton. Think of the CallbackManager as the brains of the operation—it’s what processes the outcome of the login attempt, whether the user successfully logged in, bailed halfway through, or hit a nasty error.
You'll want to initialize this manager early on, usually right in your Activity's onCreate method. It's like setting up a dedicated listener that just sits there, waiting for Facebook to report back.
Of course, users need something to tap. The SDK generously provides a pre-built LoginButton you can drop straight into your XML layouts. This button is smarter than it looks; it automatically displays "Log in with Facebook" and flips to "Log out" once a user is authenticated. It’s a massive time-saver for getting a functional UI element up and running.
This screenshot from the official docs gives you a sense of how the SDK streamlines the whole process.
You can see how the SDK breaks down a complex authentication flow into much more manageable, developer-friendly parts.
Once the button is in your layout, you need to connect it to your CallbackManager. This is done by registering a callback that spells out precisely what your app should do for every possible scenario.
When a login is successful, you get a LoginResult object. This is the prize you've been waiting for, as it holds the precious access token.
A typical callback implementation breaks down like this:
accessToken from the LoginResult and fire it off to your backend server for verification and to create a session for your user.One last thing, and it's a step developers often forget: you absolutely must forward the result from your Activity's onActivityResult method back to the CallbackManager. If you miss this, your callback will never get triggered, leaving your app completely in the dark about the login status.
Pro Tip: When you ask for permissions, less is more. Always start with the bare minimum, like
public_profile. If you need more, likelogInWithReadPermissionsmethod. This shows respect for user privacy and makes them far more likely to actually complete the login.
When you're building a cross-platform app, how you tackle android login with facebook changes quite a bit. For anyone working in React Native, the path forward really boils down to one simple question: are you in a bare React Native project, or are you using the Expo managed workflow?
Each environment has its own set of tools and a distinct setup process, so let's break them down.
If you're in a bare React Native project, your go-to solution is almost always react-native-fbsdk-next. Think of this library as a bridge that lets your JavaScript code talk directly to the native Facebook SDKs on both iOS and Android.
Getting it working requires a little more hands-on configuration. You'll need to do some native linking and make some manual tweaks to files like build.gradle and AndroidManifest.xml. But the payoff is a deeply integrated, truly native feel. Since you're hooking directly into the platform SDKs, the login experience feels incredibly smooth and can handle more complex situations without needing a web fallback.
To get started, you’ll install the package and run the linking commands to hook it into your native Android project. The real magic happens back in your JavaScript or TypeScript code, where you’ll import tools like LoginManager and AccessToken.
The flow is pretty direct and feels powerful:
LoginManager.logInWithPermissions(['public_profile', 'email']).AccessToken.getCurrentAccessToken() to grab the token data you need to authenticate the user.It's a robust approach that gives you maximum control. The only real trade-off is the extra complexity of managing native dependencies, which can occasionally cause a headache during framework upgrades.
For a deeper dive into the nuances of these frameworks, our comprehensive Expo vs. React Native tutorial breaks down the differences in project setup, development workflow, and when to choose one over the other.
Now, if you're working in the Expo managed workflow, the game completely changes. In this world, the expo-auth-session module is your best friend. Instead of messing with native SDKs, this library cleverly uses a web-based authentication flow. When a user taps your login button, it opens a secure in-app browser for them to sign in to Facebook.
The biggest advantage here is massive: no native configuration. Seriously. You don't have to touch AndroidManifest.xml or fiddle with generating key hashes. This simplifies your setup enormously and is a huge win for developers who want to move fast and avoid getting stuck in platform-specific code.
Using it is a matter of setting up an authentication request hook, like useAuthRequest, and plugging in your Facebook App ID. Once the login is complete, the browser redirects back to your app, passing the authentication token in the URL. expo-auth-session handles all the tricky parsing for you, delivering the token right back to your component.
While this web flow is incredibly convenient, it can sometimes feel a tiny bit less seamless than a pure native login. But for a huge number of apps, the sheer simplicity and ease of maintenance make it the clear winner for implementing a secure android login with facebook.
So, your app has successfully received an access token from Facebook. It’s easy to think, "Great, we're done!" but that's a dangerous assumption. Think of that token as a temporary key that’s only potentially valid. A truly secure android login with facebook never trusts a client-side token on its own.
The real work happens on your backend.
This server-side check is absolutely non-negotiable. If you skip it, you're leaving a massive security hole open. A bad actor could just forge a token, send it to your server, and waltz right into a user's account. The correct flow is straightforward but critical: your Android app gets the token from a successful login and immediately fires it off to your server for validation.
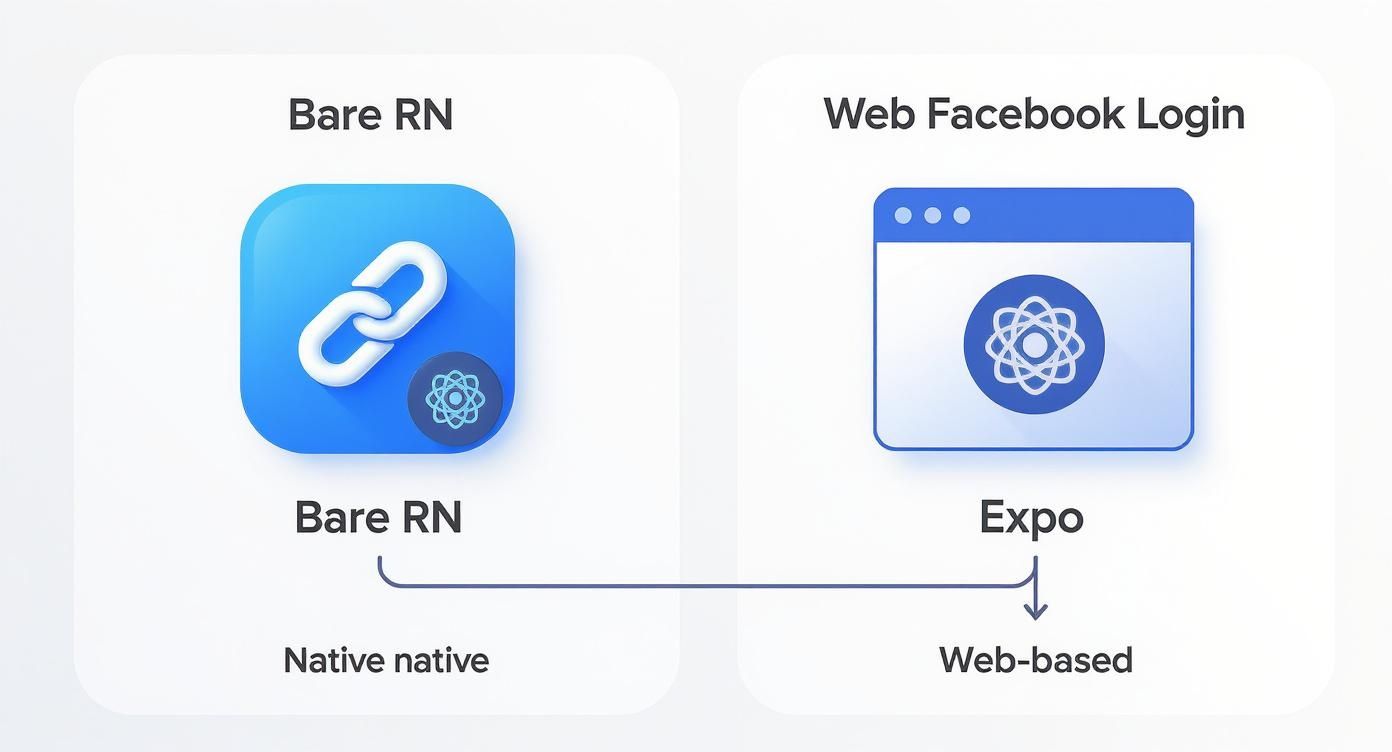
As you can see, the path to getting that token differs quite a bit between a bare React Native project and an Expo-managed one, with Expo’s web-based flow often simplifying the initial setup.
Once your backend gets its hands on that token, it needs to play detective. The next step is a direct, server-to-server call to Facebook's Graph API to ask a few simple questions.
Here’s the checklist your server needs to run through with Facebook:
app_id. You have to check that it matches your own Facebook App ID.user_id, confirming the identity of the person who just logged in.Only after you get a green light on all three of these checks should your server create a session, generate your own JWT, or give the user access to their stuff. This extra step turns a fragile client-side confirmation into a robust, trustworthy authentication flow. Getting this right often involves managing how your app opens and returns from the login screen, which is where a solid grasp of deep linking in React Native can be incredibly helpful for creating a smooth user journey.
By early 2025, Facebook's advertising platform could reach approximately 2.28 billion users, marking a 4.3% increase from January 2024 to January 2025. This incredible scale is exactly why secure token validation is so vital—it’s about protecting a potentially massive user base from bad actors. You can discover more insights about Facebook's global reach on DataReportal.
Look, when you're integrating something as fundamental as a social login, you're going to hit a few snags. It’s just part of the process. I’ve seen my fair share of them, so let's walk through some of the most common issues developers run into and get you unstuck.
This one is a classic. A user taps the login button, the Facebook screen flashes, and then... nothing. Or worse, an error. 9 times out of 10, this is a key hash mismatch. Seriously, it’s almost always the culprit.
Your first step should be to go straight back to your Facebook App dashboard and triple-check your key hashes. You need one for your debug keystore and one for your release keystore, and they have to be a perfect match. A single character off, and the whole thing breaks. While you're there, make sure your Android package name in the dashboard is identical to the applicationId in your build.gradle file.
Another big one. You get the login working, but you can't pull the user's information. Just getting a successful login isn't enough; you have to explicitly ask for the email permission.
When you kick off the login request, you need to include it alongside the default public_profile. If you're using the native Android SDK, that code would look something like logInWithReadPermissions(this, Arrays.asList("email", "public_profile")).
Once you have the access token from a successful login, you can hit the Graph API’s /me?fields=id,name,email endpoint to grab their details.
Here's a pro-tip: You can—and absolutely should—test the entire login flow from end to end before you even think about shipping. As long as your Facebook App is in "Development" mode, it's a private sandbox. Only people you've specifically added as an admin, developer, or tester can log in. This lets you iron out all the kinks safely.
Finally, let's clear up some confusion around tokens. They sound similar, but they play very different roles in the authentication dance.
For most mobile apps, just getting the access token on the client and sending it to your backend is the simplest, most common approach. But if your application deals with highly sensitive data, the authorization code flow adds a solid layer of security by making sure the "real" token never even touches the user's device.
Ready to ship your cross-platform app faster? We build production-ready React Native templates with Expo and TypeScript to give you the ultimate head start. Check out our full catalog at theappmarket.io.

Dec 07, 2025
4 min read
Master the alert in React Native. Learn to handle platform differences, build custom modals, and apply best practices for a seamless user experience.
Dec 06, 2025
4 min read
keyboardavoidingview react native: Master keyboard handling with KeyboardAvoidingView across iOS, Android, Expo, and TypeScript.

Dec 05, 2025
4 min read
A practical guide to implementing a React Native PDF viewer. Learn to compare libraries, handle native setup, and troubleshoot common issues with real code.

Dec 04, 2025
4 min read
how to validate startup idea: learn proven methods like customer interviews, MVPs, and metrics to confirm market fit.

Dec 03, 2025
4 min read
how to make app like uber: Learn core features, tech stack, development steps, testing, and launch tips.

Dec 02, 2025
4 min read
Build a rock-solid React Native setup. This guide covers Expo vs. Bare workflows, TypeScript, pnpm monorepos, NativeWind, and deployment strategies.

Dec 01, 2025
4 min read
A practical guide to Stripe React Native integration. Learn to set up your server, build payment UIs, handle webhooks, and launch secure mobile payments.

Nov 30, 2025
4 min read
Learn how to master push notifications in React Native. This guide covers setup, best practices, and advanced techniques for engaging your users.

Nov 29, 2025
4 min read
Build powerful location-based apps with our practical guide to react native with google maps. Get setup guides, pro tips, and best practices for iOS & Android.

Nov 28, 2025
4 min read
Explore deep linking react native with a practical guide to configuring URL schemes, universal links, navigation, and testing for Expo and bare apps.

Nov 28, 2025
4 min read
A practical guide to building a scalable React Native design system. Learn to implement tokens, theming, and tools like NativeWind and gluestack-ui.

Nov 26, 2025
4 min read
Learn why react native expo templates speed up your projects with ready-made patterns and practical tips.

Nov 25, 2025
4 min read
Discover how to improve developer productivity with actionable strategies for workflow, tooling, and culture. A practical guide for software engineering teams.

Nov 24, 2025
4 min read
Discover the best cross platform app development tools. Compare top frameworks like Flutter and React Native to build and ship apps faster.

Nov 23, 2025
4 min read
This Expo React Native tutorial provides a hands-on guide to building cross-platform apps. Learn setup, styling with NativeWind, navigation, and deployment.

Nov 22, 2025
4 min read
Build beautiful UIs faster with this guide to Tailwind CSS React Native. Learn setup, styling, and advanced techniques with NativeWind for mobile apps.

Nov 21, 2025
4 min read
Explore our curated list of 7 top-tier React Native app examples. Discover production-ready templates and resources to build your next app faster.
Mar 19, 2025
4 min read
theappmarket offers React Native UI templates to accelerate development. Get customizable, production-ready React Native app templates and Ui kit, some free. Build faster & smarter today!
