Rapid Friday Sale is Live!
Get exclusive discounts on all products
Dec 01, 2025

4 min read


Taking payments in a mobile app used to be a massive headache, but with Stripe and React Native, it's become surprisingly straightforward. The official @stripe/stripe-react-native SDK gives you a suite of pre-built UI components and hooks that do all the heavy lifting. This means you can build a secure, polished checkout experience for both iOS and Android from a single codebase. Honestly, it's the go-to stack for a reason.
Before we jump into the code, let's get the foundation right. A successful Stripe integration is more than just installing a package; it's about understanding how all the pieces securely talk to each other. Nailing this now saves you from major security headaches later on.
The whole payment dance involves three key players: your React Native app (the client), your own backend server, and the Stripe API. They work together in a specific, secure sequence so your app never has to directly touch sensitive credit card details.
This diagram breaks down the server-driven flow we're aiming for.
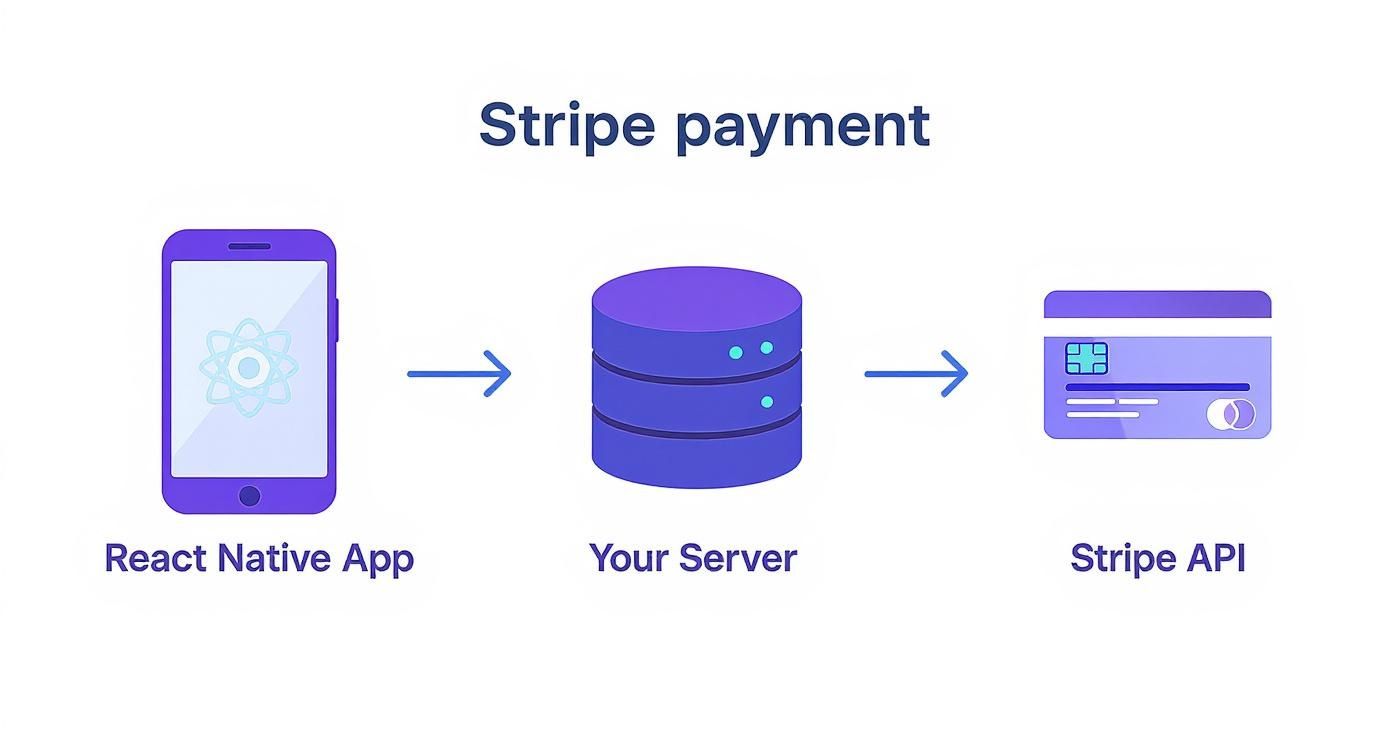
As you can see, the app's job is really just to collect payment info and show the UI. Your server handles the sensitive work of creating the payment and talking to Stripe.
To make this guide as smooth as possible, you’ll want to have a few things ready.
Got all that? Perfect. Let's talk concepts.
Stripe’s world revolves around a few key ideas. Getting a handle on these terms now will make the code we write later click into place.
The most critical concept is the PaymentIntent. Think of it as a state machine for a single transaction. It tracks the entire lifecycle of a customer's payment—from the moment it's created on your server to when it's successfully confirmed by the user, including any extra steps like 3D Secure authentication. Your server creates the PaymentIntent, and your app uses a unique client_secret from it to finalize the charge.
You'll also be working with two types of API keys:
pk_ and are designed to be used in your client-side React Native code. They're safe to expose.sk_ and are for your server only. You must guard these like a password. They grant powerful access to your Stripe account, so never, ever put one in your mobile app's code.By using this server-driven approach with PaymentIntents, your app becomes PCI compliant without you having to do much. Your app never directly handles raw credit card numbers, which massively reduces your security burden. Stripe's SDK tokenizes the data on the device, ensuring that sensitive info only ever touches Stripe’s own secure servers.
This separation of concerns—client-side UI and server-side logic—is the bedrock of a secure and modern Stripe integration. It lets you create a fantastic user experience without compromising on the robust security that financial transactions demand.
While your React Native app is the face of the operation, the real muscle behind your payment flow has to live on a server. Trying to manage payments directly from the client is a disaster waiting to happen—it exposes your secret API keys and immediately throws you out of PCI compliance. Your backend needs to be the trusted middleman between your app and Stripe.
We're going to spin up a lightweight server using Node.js and Express, a classic and straightforward combo. This server has one primary job: to create a PaymentIntent for your app. This whole approach is designed to keep your sk_ secret key locked down in your server environment, which is the absolute cornerstone of a safe integration.

First things first, let's get the project structure in place. Just create a new directory for the server, initialize a Node.js project, and pull in the dependencies we'll need.
You'll want a few packages:
express for the web server itself.stripe for the official Node.js library.dotenv to keep your secret keys out of your code.cors to let your mobile app talk to the server.Fire up your terminal and run these commands:
mkdir stripe-server cd stripe-server npm init -y npm install express stripe dotenv cors
And that's it. This simple foundation is all you need to create a robust endpoint for your stripe react native app. The beauty of this model is its simplicity—it does one thing and does it well.
Now for the fun part: the code. We're going to create a single POST endpoint, /create-payment-intent, that your app will call when it's time to kick off a transaction.
This endpoint will take the payment amount from your app, use it to create a PaymentIntent with the Stripe API, and then send back the client_secret. Think of the client_secret as a one-time-use token that gives your app permission to confirm that one specific payment on the front end.
Here’s what that looks like in practice, using TypeScript for some extra type safety and clarity:
// server.ts import express from 'express'; import Stripe from 'stripe'; import dotenv from 'dotenv'; import cors from 'cors';
dotenv.config();
const stripe = new Stripe(process.env.STRIPE_SECRET_KEY!, { apiVersion: '2024-04-10', typescript: true, });
const app = express(); app.use(express.json()); app.use(cors()); // Enable CORS for your app's domain in production
app.post('/create-payment-intent', async (req, res) => { const { amount } = req.body; // Amount in the smallest currency unit (e.g., cents)
try { const paymentIntent = await stripe.paymentIntents.create({ amount: amount, currency: 'usd', // Or your desired currency automatic_payment_methods: { enabled: true, }, });
res.json({ clientSecret: paymentIntent.client_secret });
} catch (error) { console.error("Error creating PaymentIntent:", error); res.status(500).json({ error: 'Failed to create PaymentIntent' }); } });
const PORT = process.env.PORT || 4242;
app.listen(PORT, () => console.log(Server running on port ${PORT}));
A Note on Amounts: One of the most common trip-ups is getting the
amountformat wrong. Stripe expects this value in the smallest currency unit. For USD, that means cents. So, if you want to charge $19.99, you have to pass the integer1999to the API. You should always do this conversion on the server to prevent anyone from messing with the price on the client side.
Hardcoding your Stripe secret key into your files is a massive security foul. If you accidentally commit it to a public repository, your account could be drained in minutes. The dotenv package solves this by letting you store keys in a local .env file that you exclude from version control.
Just create a .env file in your server's root directory:
STRIPE_SECRET_KEY=sk_test_...your_secret_key_here
Then, make absolutely sure you add .env to your .gitignore file. This simple step is non-negotiable for any real-world application. This secure, server-driven architecture is exactly how Stripe is able to handle mind-boggling transaction volumes. To give you some perspective, Stripe processed over $31 billion during the Black Friday to Cyber Monday weekend in late 2024 alone, a huge leap from $18.6 billion in 2023. You can see more Stripe stats on Chargeflow.io.
With this secure backend in place, you now have a reliable service that creates payment sessions on demand. Your React Native app doesn't need to know any secrets—just how to ask for a client_secret and use it to finalize the payment, which is exactly what we’ll tackle next.
With your server ready to create PaymentIntents, it's time to bring the payment experience to life inside your React Native app. This is where the magic happens for the user, and a slick, trustworthy UI is absolutely non-negotiable.
Let's walk through installing the official Stripe SDK, getting it configured for your project, and building out that essential card input field.
<iframe width="100%" style="aspect-ratio: 16 / 9;" src="https://www.youtube.com/embed/1r-F3FIONl8" frameborder="0" allow="autoplay; encrypted-media" allowfullscreen></iframe>The library we'll be using is @stripe/stripe-react-native. This is the modern, officially supported way to handle payments. It replaces the older, community-maintained packages and gives you a clean, hook-based API and pre-styled UI components that seriously simplify the whole process.
Getting the Stripe SDK installed is pretty straightforward, but the exact steps change slightly depending on whether you're in an Expo Managed Workflow or a bare React Native project. I'll cover both so you're good to go, no matter your setup.
If you're all-in on Expo, life is good. The process is incredibly simple because Expo's build system and config plugins handle all the tricky native configuration for you.
Just pop open your terminal and run this command in your project's root:
npx expo install @stripe/stripe-react-native
Using expo install here is key. It's much safer than npm or yarn because it guarantees you get a version of the SDK that plays nicely with your specific Expo SDK version, which helps you dodge those frustrating native code mismatches.
For those of you running a bare React Native setup, the process is a familiar two-step: install the package, then link the native dependencies.
First, add the package using your favorite manager:
npm install @stripe/stripe-react-native
Or if you prefer Yarn:
yarn add @stripe/stripe-react-native
Once that's done, you need to link the native iOS modules. Just navigate into your ios directory and run the pod installer:
cd ios && pod install
On the Android side, the library will usually be auto-linked. A quick rebuild of your app should finish the job and make sure all the native components are ready for your JavaScript code to use.
Before we dive into the code, let's quickly compare what you're signing up for with each approach.
| Feature | Expo Managed Workflow | Bare React Native |
|---|---|---|
| Initial Setup | A single npx expo install command handles everything. |
Requires npm/yarn install plus manual pod install for iOS. |
| Native Config | Fully automated by Expo's config plugins. | You're responsible for managing native project files (Xcode, Gradle). |
| Updates | expo upgrade manages SDK and dependency compatibility. |
You manually update packages and resolve native conflicts. |
| Maintenance | Lower overhead; Expo abstracts away native complexities. | Higher overhead; requires native iOS and Android expertise. |
Ultimately, Expo offers a much smoother ride for setup and maintenance, while the bare workflow gives you maximum control if you need to dive deep into native code.
With the SDK installed, you need to initialize it with your publishable key (the one that starts with pk_test_). The cleanest way to handle this is by wrapping your entire application—or at least the payment-related parts—in the StripeProvider component.
This provider cleverly uses React's Context API to make the Stripe instance available to any child component. This means you can use powerful hooks like useConfirmPayment anywhere in your payment flow without the headache of prop drilling.
Here’s what a typical setup looks like in your main App.tsx file:
import { StripeProvider } from '@stripe/stripe-react-native'; import MyPaymentScreen from './screens/MyPaymentScreen';
export default function App() { return ( <StripeProvider publishableKey="pk_test_YOUR_PUBLISHABLE_KEY" // You'll need this for Apple Pay later on merchantIdentifier="merchant.com.your-app-identifier" > <MyPaymentScreen /> </StripeProvider> ); }
Pro Tip: Please, don't hardcode your keys directly in the code! A much better practice is to store them in an environment variable file (like
.env) and load them at runtime. This makes it a breeze to switch between your test and live keys without touching your source code.
This architecture gives you a solid foundation for building out the rest of your payment flow. It's a clean separation of concerns that will pay dividends as your app grows.
Now for the fun part. With the provider in place, you can start using Stripe's pre-built UI components. The most fundamental of these is <CardField />.
This single component is a powerhouse. It renders a complete credit card input form—card number, expiration date, CVC, and postal code—while handling all the validation, formatting, and security for you right out of the box.
Dropping it into your payment screen is as simple as adding the component to your JSX. You can then use a simple useState hook to keep track of the details the user enters.
Here's a practical example:
import React, { useState } from 'react'; import { View, Button, Alert } from 'react-native'; import { CardField, CardFieldInput } from '@stripe/stripe-react-native';
const CheckoutScreen = () => { // We'll use this state to track if the card form is complete const [cardDetails, setCardDetails] = useState<CardFieldInput.Details | null>(null);
const handlePayPress = () => { // A simple check before trying to process a payment if (!cardDetails?.complete) { Alert.alert("Please fill in the card details completely."); return; } // Logic to confirm the payment will go here console.log("Card details are complete and valid. Ready to pay!"); };
return ( <View> <CardField postalCodeEnabled={false} // You can disable this if you don't need it style={{ height: 50, width: '100%', marginVertical: 20, }} onCardChange={(details) => { setCardDetails(details); }} /> <Button title="Pay Now" onPress={handlePayPress} // The button is disabled until the form is valid disabled={!cardDetails?.complete} /> </View> ); };
The onCardChange callback is what makes this component so great. It fires on every keystroke, giving you a state object that includes a complete boolean. This makes it ridiculously easy to enable or disable the "Pay" button, preventing users from trying to submit incomplete or invalid information.
To jumpstart your UI work, you might want to check out some pre-built React Native Expo templates. They often come with beautifully styled payment screens already integrated, which can save you a ton of time and let you focus on your core business logic instead of wrestling with stylesheets.
Okay, you've got your UI hooked up, and your server is ready to churn out PaymentIntents. This is the moment of truth: actually taking the payment. This is where all the client-side pieces click into place to make a secure, successful transaction happen inside your stripe react native app.

The star of the show here is the useConfirmPayment hook from the SDK. It does all the heavy lifting for the client-side confirmation flow. It takes the tokenized card details from your <CardField /> and the client_secret we generated, sends them securely to Stripe, and then tries to authorize the payment.
The useConfirmPayment hook gives you back two things: a confirmPayment function and a loading state. You'll call that function right when your user hits the "Pay" button. It’s a clean, promise-based API that will either resolve with the payment details on success or an error object if things go wrong.
Let's plug this into the CheckoutScreen component we were working on earlier.
import { useConfirmPayment } from '@stripe/stripe-react-native';
const CheckoutScreen = () => { const { confirmPayment, loading } = useConfirmPayment(); const [cardDetails, setCardDetails] = useState<CardFieldInput.Details | null>(null);
const handlePayPress = async () => { if (!cardDetails?.complete) { Alert.alert("Please fill out your card details."); return; }
// First, we grab the client_secret from our server.
const response = await fetch('YOUR_SERVER_URL/create-payment-intent', {
  method: 'POST',
  headers: { 'Content-Type': 'application/json' },
  body: JSON.stringify({ amount: 1999 }), // e.g., $19.99
});
const { clientSecret } = await response.json();

// Now, we confirm the payment on the client.
const { paymentIntent, error } = await confirmPayment(clientSecret, {
  paymentMethodType: 'Card',
});

// Finally, handle the result.
if (error) {
  Alert.alert(`Payment failed: ${error.message}`);
} else if (paymentIntent) {
  Alert.alert("Payment successful!");
  console.log('Payment succeeded with ID:', paymentIntent.id);
}
};
// ... rest of the component };
This whole flow is incredibly solid. One of the best parts is that if the payment requires something like 3D Secure authentication, the SDK automatically handles it by popping up the necessary native modal. You don’t have to write a single extra line of code to deal with those complex Strong Customer Authentication (SCA) rules.
A simple card field is a must-have, but adding digital wallets like Apple Pay and Google Pay is a massive upgrade. They offer a checkout experience that's faster, more familiar, and often more secure—a combination that can give your conversion rates a serious boost. And honestly, integrating them with the Stripe SDK is surprisingly pain-free.
The first thing you need to do is check if the user's device can even handle these payment methods. The useApplePay and useGooglePay hooks give you isApplePaySupported and isGooglePaySupported booleans, which makes it easy to conditionally show the right payment button.
Offering one-tap payment options isn't a luxury anymore; it’s a core user expectation. People trust these native systems, and removing the friction of digging out a credit card is probably the single biggest improvement you can make to your checkout flow.
Once you know the device is good to go, you can trigger the native payment sheet.
Let's walk through adding an Apple Pay button. The process for Google Pay is almost identical, so you can easily adapt this logic.
isApplePaySupported flag to decide if the Apple Pay button should even be visible.presentApplePay function, passing in details about the cart like the total and currency.paymentMethod. You'll use this to confirm the PaymentIntent you created earlier.Here's what that flow looks like in a simplified example:
import { useApplePay } from '@stripe/stripe-react-native';
const { isApplePaySupported, presentApplePay, confirmApplePayPayment } = useApplePay();
const handleApplePay = async () => { if (!isApplePaySupported) return;
const { error: presentError } = await presentApplePay({ cartItems: [{ label: 'My Awesome Product', amount: '19.99' }], country: 'US', currency: 'USD', });
if (presentError) { // This means the user cancelled or something else went wrong. return; }
// Now get the client_secret from your server. const { clientSecret } = await fetchClientSecret();
const { error: confirmError } = await confirmApplePayPayment(clientSecret);
if (confirmError) { Alert.alert('Payment failed', confirmError.message); } else { Alert.alert('Payment successful!'); } };
Adding these digital wallet options makes your payment screen feel so much more polished and user-friendly. A cohesive, native-feeling UI is crucial for building trust, and if you're looking to speed up that process, our guide on building a React Native design system is packed with useful insights.
So, your React Native app pops up a "Payment Successful!" message. Job done, right? Not so fast.
Relying only on what the app thinks happened is a recipe for disaster. What if the user kills the app right after paying? Or their Wi-Fi cuts out at that exact moment? You've just created a silent failure—a paid-for order that never gets fulfilled. This is how you get angry customers.
The only truly reliable way to handle this is with Stripe Webhooks. Think of a webhook as an automated message that Stripe sends to your server the instant something important happens, like a payment succeeding. This behind-the-scenes communication is the foundation of a professional post-payment system.

This approach separates your critical business logic—like updating inventory or sending a receipt—from the user's interaction in the app. It’s how you guarantee that every successful payment triggers the correct action on your backend, regardless of what's happening on the user's phone.
First things first, you'll need to set up a new endpoint on your server that does nothing but listen for these pings from Stripe. This endpoint has to be publicly accessible, of course, so Stripe’s servers can find it.
But you can't just trust any random request that shows up. You have to be certain it’s actually coming from Stripe. Thankfully, Stripe makes this easy by including a special stripe-signature header in every webhook request. Your server can use this signature, along with a secret key you get from your Stripe dashboard, to cryptographically verify that the request is legit.
Here’s a practical example of how you'd set up a verified listener using Express and the official Stripe Node.js library:
// Add a separate route for webhooks // IMPORTANT: Use express.raw for the body parser on this route app.post('/webhook', express.raw({type: 'application/json'}), (req, res) => { const sig = req.headers['stripe-signature']; const endpointSecret = process.env.STRIPE_WEBHOOK_SECRET!;
let event;
try {
event = stripe.webhooks.constructEvent(req.body, sig, endpointSecret);
} catch (err) {
res.status(400).send(Webhook Error: ${err.message});
return;
}
// Handle the event
switch (event.type) {
case 'payment_intent.succeeded':
const paymentIntent = event.data.object;
console.log('PaymentIntent was successful!', paymentIntent.id);
// Fulfill the order, send receipt, etc.
break;
// ... handle other event types
default:
console.log(Unhandled event type ${event.type});
}
res.json({received: true}); });
Pay close attention to that express.raw({type: 'application/json'}) middleware. This is the secret sauce. The signature verification needs the raw, untouched request body. If you use the standard express.json() parser, it'll modify the body, and the signature check will fail every single time. It's a common "gotcha."
Inside your handler, a switch statement is perfect for routing different event types. For most basic payment flows, the one you care about most is payment_intent.succeeded. Once you receive that, you know the money is good, and you can confidently kick off your backend processes:
A critical concept here is idempotency. It’s a fancy word for a simple idea: if you receive the same event multiple times, you should only process it once. Stripe can sometimes resend a webhook if it doesn't get a confirmation. Your code needs to be smart enough to handle this without, for example, shipping the same product twice. A quick check to see if the order has already been fulfilled is all it takes.
This webhook-driven architecture isn't just a "nice-to-have"; it's what makes an e-commerce app robust enough for the real world. Stripe's flexibility in mobile frameworks like React Native is a huge plus. While app stores enforce strict rules and high fees for digital in-app purchases, using Stripe for physical goods or services gives you total control. If you're curious about the nuances, Adapty has a great breakdown on using Stripe for in-app purchases.
When you're dealing with payments, a lot of specific questions pop up. Let's tackle some of the most common ones developers have when they're working with the Stripe React Native SDK to help you sidestep any potential headaches.
This is a big one, and getting it wrong can get your app rejected. The short answer is: it depends on what you're selling.
While you technically can wire it up, using Stripe to sell digital goods—think unlocking premium features, buying in-game currency, or app subscriptions—is almost always a violation of both Apple's and Google's app store rules.
For anything digital that's consumed inside the app, you absolutely have to use their native In-App Purchase APIs. Where Stripe shines, and where it’s fully compliant, is for:
Stick to these lines, and you’ll sail through the app review process without a problem.
This is one of the best parts about using the modern SDK. The @stripe/stripe-react-native library handles Strong Customer Authentication (SCA), including 3D Secure, pretty much automatically.
When your app calls the confirmPayment function, Stripe's systems do the heavy lifting. They analyze the transaction's risk level and check if the card issuer requires an extra layer of security.
If it does, the SDK natively pops up the right modal or web view for the user to verify themselves. You don't have to write a single line of client-side code to manage this flow—it's all orchestrated by the PaymentIntents API. It's a huge time-saver that ensures you're meeting today's tough security standards.
The seamless, automatic handling of 3D Secure is a core benefit of using the modern PaymentIntents flow. It takes a really complex security requirement off your plate so you can focus on building a great user experience.
Testing a payment flow isn't just a good idea; it's non-negotiable. Your go-to tool here should always be Stripe's test mode. It's a full-fledged sandbox environment that lets you mimic the entire payment lifecycle without a single real dollar changing hands.
First thing's first: make sure you're using your test API keys (the ones starting with pk_test_... and sk_test_...) in both your app and on your server. From there, Stripe gives you a whole list of special test card numbers you can use to trigger different outcomes:
For the backend, the Stripe CLI is your best friend. You can use it to fire off mock webhook events directly to your server's endpoint. This is absolutely critical for making sure your post-payment logic—like sending email receipts, updating your database, or kicking off a shipping process—is working exactly as expected before you go live.
Ready to build your app faster? theappmarket offers a massive collection of production-ready React Native templates that can save you hundreds of hours. Get started today at https://theappmarket.io.

Dec 08, 2025
4 min read
android login with facebook: Learn to set up the Facebook SDK, manage tokens, and implement secure authentication across native Android, cross-platform apps.

Dec 07, 2025
4 min read
Master the alert in React Native. Learn to handle platform differences, build custom modals, and apply best practices for a seamless user experience.

Dec 06, 2025
4 min read
keyboardavoidingview react native: Master keyboard handling with KeyboardAvoidingView across iOS, Android, Expo, and TypeScript.

Dec 05, 2025
4 min read
A practical guide to implementing a React Native PDF viewer. Learn to compare libraries, handle native setup, and troubleshoot common issues with real code.

Dec 04, 2025
4 min read
how to validate startup idea: learn proven methods like customer interviews, MVPs, and metrics to confirm market fit.

Dec 03, 2025
4 min read
how to make app like uber: Learn core features, tech stack, development steps, testing, and launch tips.

Dec 02, 2025
4 min read
Build a rock-solid React Native setup. This guide covers Expo vs. Bare workflows, TypeScript, pnpm monorepos, NativeWind, and deployment strategies.

Nov 30, 2025
4 min read
Learn how to master push notifications in React Native. This guide covers setup, best practices, and advanced techniques for engaging your users.

Nov 29, 2025
4 min read
Build powerful location-based apps with our practical guide to react native with google maps. Get setup guides, pro tips, and best practices for iOS & Android.

Nov 28, 2025
4 min read
Explore deep linking react native with a practical guide to configuring URL schemes, universal links, navigation, and testing for Expo and bare apps.

Nov 28, 2025
4 min read
A practical guide to building a scalable React Native design system. Learn to implement tokens, theming, and tools like NativeWind and gluestack-ui.

Nov 26, 2025
4 min read
Learn why react native expo templates speed up your projects with ready-made patterns and practical tips.

Nov 25, 2025
4 min read
Discover how to improve developer productivity with actionable strategies for workflow, tooling, and culture. A practical guide for software engineering teams.

Nov 24, 2025
4 min read
Discover the best cross platform app development tools. Compare top frameworks like Flutter and React Native to build and ship apps faster.

Nov 23, 2025
4 min read
This Expo React Native tutorial provides a hands-on guide to building cross-platform apps. Learn setup, styling with NativeWind, navigation, and deployment.

Nov 22, 2025
4 min read
Build beautiful UIs faster with this guide to Tailwind CSS React Native. Learn setup, styling, and advanced techniques with NativeWind for mobile apps.

Nov 21, 2025
4 min read
Explore our curated list of 7 top-tier React Native app examples. Discover production-ready templates and resources to build your next app faster.

Mar 19, 2025
4 min read
theappmarket offers React Native UI templates to accelerate development. Get customizable, production-ready React Native app templates and Ui kit, some free. Build faster & smarter today!