Rapid Friday Sale is Live!
Get exclusive discounts on all products
Dec 02, 2025

4 min read

When you're starting a new React Native project, one of the first and most critical decisions you'll make is choosing your development workflow. This isn't just a small technical detail—it sets the entire foundation for your project, influencing everything from how fast you can build to what your app can ultimately do.
You're essentially choosing between two main paths: the guided, all-in-one experience of Expo or the complete, hands-on control of the Bare workflow.
Think of this choice as picking your vehicle for a road trip. Expo is like a fully-equipped, modern RV. It has everything you need built-in, letting you hit the road immediately and enjoy the scenery. The Bare workflow, on the other hand, is like being handed the keys to a powerful, custom-built engine and chassis. You can build any vehicle you can imagine, but you're responsible for bolting everything together yourself.
For a startup trying to get an MVP to market in weeks, Expo is often a no-brainer. But for an established company needing to integrate a proprietary hardware SDK or a performance-critical C++ library, the Bare workflow is the only way to go.
The biggest win with Expo is simplicity. It masterfully hides the complexities of native build tools like Xcode and Android Studio, letting you stay laser-focused on writing JavaScript and React.
npx create-expo-app to running a "Hello World" on your actual phone in under five minutes. No messing with simulators or native build environments.If you want to see just how quickly you can get moving, our Expo React Native tutorial offers a great hands-on walkthrough.
The core trade-off with Expo is giving up some native control for a significant boost in development speed and convenience. If your app doesn't need custom native code, Expo is almost always the faster, more efficient choice.
Going with the Bare workflow puts you directly in the driver's seat. You'll have ios and android folders in your project, giving you complete access to the underlying native code. It's more responsibility, but it comes with total freedom.
This path is the right call when you know you'll need to bridge the gap between JavaScript and native platform capabilities. The demand for these kinds of powerful, deeply integrated apps is booming. In fact, the global React Native app development market was valued at USD 325 million in 2024 and is on track to hit USD 499 million by 2031. This explosive growth shows just how many teams are using the framework for complex, high-stakes applications.
Sometimes, a simple flowchart is the best way to make a decision. If you find yourself needing to write or integrate custom native code, the choice becomes clear.
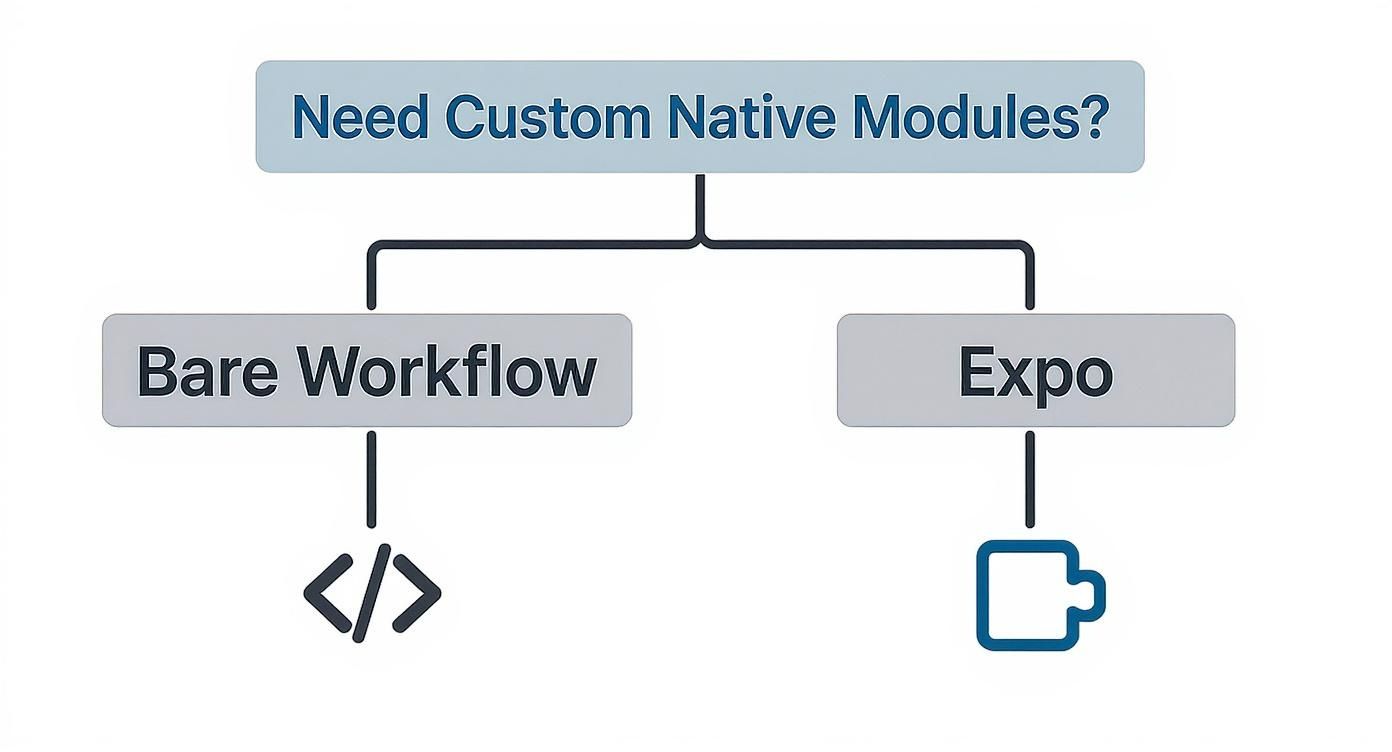
This visual sums it up perfectly—your need for native modules is the primary fork in the road.
To help you decide, here's a quick comparison of the two approaches based on what matters most during development.
| Feature | Expo (Managed Workflow) | Bare Workflow |
|---|---|---|
| Initial Setup | Very fast; runs on a device in minutes. | Slower; requires Xcode and Android Studio setup. |
| Development Speed | High. Focus is on JS/TS. OTA updates are a huge time-saver. | Moderate. Requires managing native dependencies and build processes. |
| Native Modules | Limited to the Expo SDK and compatible libraries. | Unlimited. Full access to any native module or custom code. |
| Build Process | Abstracted away. Handled by Expo's cloud services (EAS Build). | Manual. You control the entire build process with Xcode/Android Studio. |
| App Size | Can be slightly larger due to the included Expo runtime. | Potentially smaller, as you only include what's necessary. |
| Best For | MVPs, content apps, internal tools, and most consumer apps. | Apps needing custom hardware integration, unique UI, or high performance. |
Ultimately, neither workflow is "better"—they're just different tools for different jobs. Your project's specific requirements should be the deciding factor. Choose the path that empowers your team to build the best possible app without getting bogged down by unnecessary complexity.
Alright, you’ve picked your workflow—Expo or Bare. Now for the real work: building a development environment that’s built to last. A professional react native setup is more than just getting npx create-expo-app to run. It's about thinking ahead. We're talking about putting together a toolchain that keeps your code clean, your dependencies sane, and your team on the same page.
To get there, we need to make some careful choices. From how you manage Node.js versions to the package manager you pick, every decision impacts your day-to-day efficiency. This isn’t just about making an app; it’s about creating a sustainable ecosystem where your codebase can actually thrive.
Before you write a single line of React Native code, your local machine needs to be properly equipped. Trust me, trying to cut corners here or using outdated tools is a one-way ticket to cryptic errors and hours of frustration.
Your first stop is Node.js. But just grabbing the latest version from their website isn't the pro move. Different projects often need different Node versions, and that can get messy fast. A version manager is the only way to go.
nvm is the gold standard. It lets you install and juggle multiple Node.js versions with a simple command, so every project gets the exact environment it needs.nvs has you covered. It offers the same core functionality and plays nicely with shells like PowerShell and Git Bash.Next up for macOS users is Watchman. This is a file-watching service from Meta that helps the Metro bundler see your code changes instantly. It’s the magic behind that snappy, responsive hot-reloading experience you love. A quick brew install watchman is all it takes.
The next big decision is your package manager. The default is npm, and Yarn has a solid following, but we’re huge advocates for pnpm. Its unique take on dependency management is a massive win for any modern react native setup, especially as your project grows.
While npm and Yarn can create monstrous, deeply nested node_modules folders with tons of duplicate packages, pnpm is smarter. It uses a content-addressable store, meaning it keeps just one copy of each package version on your disk and uses hard links to bring them into your project's node_modules folder.
This might sound technical, but the difference is night and day. It saves an incredible amount of disk space and makes installations significantly faster because packages are only downloaded once. Even better, it helps you sidestep the dependency hell that can absolutely cripple large applications.
This clean, efficient structure also makes pnpm the perfect foundation for a monorepo—something we'll get into soon. By handling dependencies this way, it simplifies sharing code between different parts of your app, like a common UI library. Speaking of which, a solid package manager is essential when you're crafting a consistent look and feel; our guide on building a React Native design system explores this in more depth.
Let’s be real: starting a new project in 2024 without TypeScript is asking for trouble. JavaScript is flexible, sure, but that flexibility often leads to runtime errors that a good type system would have caught ages ago. TypeScript adds a layer of static typing that makes your codebase predictable and safe.
Kicking off your React Native project with TypeScript from the get-go is a non-negotiable best practice for us. The benefits are immediate:
To start a new Expo project with TypeScript, the command is dead simple:
npx create-expo-app my-app -t with-typescript
This one command scaffolds a new project with a tsconfig.json file already configured. It’s a small step that puts you on the right path to writing cleaner, more maintainable code from day one. This initial investment in a typed react native setup pays for itself a hundred times over as your app gets more complex.
As your React Native app starts to take off, you’ll inevitably hit a wall. Suddenly, you've got shared logic, custom hooks, and UI components being copied and pasted all over the place or imported with messy relative paths. This is the exact moment a monorepo—a single home for all your distinct projects—stops being a "nice-to-have" and becomes an absolute necessity for a clean React Native setup.
I’m a huge fan of pairing this strategy with pnpm. Unlike its cousins, pnpm was practically built for monorepos. It uses a clever content-addressable storage system, which means it installs each version of a package just once on your machine. Then, it uses hard links to connect them to your projects. The result? Drastically faster install times and a lot less disk space eaten up.
But the real win is how it makes sharing code between your packages feel so natural. It’s the architectural backbone that keeps your growing app from spiraling into a tangled mess.
Getting a monorepo off the ground is surprisingly simple. The big idea is to create a structure that logically separates your main app from all its reusable bits and pieces. Most of the time, this just means having a root packages directory that holds each of your individual workspaces.
A classic, battle-tested structure I often recommend looks something like this:
packages/app: This is your main React Native application, probably bootstrapped with Expo. It will be the primary consumer of everything you build in the other packages.packages/ui: Think of this as your shared component library. Every button, card, and input field you build here can be used in your mobile app and, down the line, maybe even a web app.packages/hooks: A dedicated spot for your custom hooks. Things like useAuthentication or useAPI that you'll want to share across your entire application ecosystem live here.To let pnpm know you're running a monorepo, all you need is a pnpm-workspace.yaml file in your project's root.
packages:
That tiny file is all it takes. It tells pnpm to treat every folder inside packages as part of the workspace, letting you install dependencies from the root and link your local packages together without any fuss.
Now for the magic. Let's say you just crafted a beautiful custom Button component inside your packages/ui library. How do you get it into your main app? With a pnpm monorepo, you just add the ui package as a dependency to your app package.
You can knock this out with a single command from your project root:
pnpm --filter app add ui@*
This command tells pnpm to find the app workspace and wire up the local ui package as a dependency. From that point on, in any file inside packages/app, you can import and use your shared component just like you would any other package from npm.
// In packages/app/screens/HomeScreen.tsx import { Button } from 'ui';
export default function HomeScreen() { return <Button title="Welcome!" onPress={() => console.log('Pressed!')} />; }
This setup gives you a clean separation of concerns and makes reusability a core part of your workflow—which is the secret to moving fast. By centralizing your shared code, you guarantee consistency and make updates a whole lot less painful.
Adopting a monorepo is a strategic move that pays huge dividends in maintainability and developer velocity. You’re no longer just building an app; you're building a scalable system of interconnected packages.
This structure also happens to amplify one of React Native's biggest strengths: code sharing. In 2025, it’s common for developers to share between 70% and 85% of their React Native codebase between iOS and Android. This can lead to a 30–40% faster time-to-market compared to building two separate native apps. You can find more insights on these cross-platform development trends on metadesignsolutions.com. A monorepo just takes this a step further, making it trivial to share that same code with a web app or other services.
Alright, once your project structure is sorted, it's time for the fun part: making your app look good. In today's fast-paced world, nobody has time to manually write style objects for every single button and view. It's a massive drag on productivity. This is exactly why utility-first CSS, made famous by Tailwind CSS, is such a breath of fresh air for mobile development.
To get that professional finish without the headache, we'll pull in two tools that are practically made for each other: NativeWind and gluestack-ui. Think of NativeWind as the bridge that brings Tailwind's awesome utility classes into the React Native world. Then, you have gluestack-ui, which gives you a whole library of pre-built, accessible components ready to be dressed up.
So, what does NativeWind actually do? It cleverly translates Tailwind CSS classes into React Native's StyleSheet objects behind the scenes. Instead of wrestling with nested style objects, you just sprinkle familiar, readable class names directly onto your components in the JSX.
This completely changes the way you work. You can build out complex UIs and tweak styles without ever jumping to a separate stylesheet, keeping you in the zone and moving fast. If you want to really get into the weeds of this approach, our guide on using Tailwind CSS with React Native is packed with detailed examples and pro tips.
NativeWind is brilliant for custom styling, but you don't want to build every checkbox, modal, and input field from the ground up. That’s where gluestack-ui steps in. It's a universal and accessible component library designed to work hand-in-glove with NativeWind.
This combination is a powerhouse. You lean on gluestack-ui for the solid, accessible component structure and then use NativeWind for all the styling. It gives you the perfect blend of speed and creative freedom, which is why it's a foundational piece of our templates here at theappmarket. The massive growth of React Native, used by over 25,116 companies globally as of 2025, is fueled by this kind of powerful tooling. You can dig into more stats about React Native's professional adoption on tms-outsource.com.
Let's put this all together and see how it works in a real scenario. We'll build a simple card component. Once you've installed nativewind and @gluestack-ui/themed, you can get straight to building.
A quick look at the official gluestack-ui docs reveals how their components are put together from smaller, themed pieces. This approach gives you incredibly fine-grained control.
This screenshot shows exactly what I mean—a Button is composed of ButtonText, ButtonSpinner, and ButtonIcon, letting you customize every part.
Let's create a ProfileCard component. We'll grab a Box, Heading, and Text from gluestack-ui and style them up with NativeWind classes.
import { Box, Text, Heading } from '@gluestack-ui/themed';
const ProfileCard = () => { return ( <Box className="p-4 bg-white rounded-lg shadow-md m-4"> <Heading className="text-xl font-bold text-gray-800 mb-2"> Jane Doe </Heading> <Text className="text-base text-gray-600"> React Native Developer </Text> <Text className="text-sm text-gray-500 mt-4"> Building beautiful cross-platform applications with modern tools. </Text> </Box> ); };
Just like that, you have a fully styled, responsive card component in just a handful of lines. Notice there are no separate
StyleSheetobjects anywhere. The utility classes likep-4,rounded-lg, andfont-boldmake it immediately obvious what the styles are doing. This is the kind of speed you unlock with a modern styling setup.

Alright, you've got a solid project structure and your styling is looking sharp. Now it's time to shift gears from building to running, testing, and ultimately, shipping your app. A truly production-ready react native setup isn't just about having a nice codebase; it's about making debugging and deployment feel smooth and predictable. This is where your app truly comes to life on actual devices.
First, we'll get your app running on the big three: iOS, Android, and the web. After that, we’ll dive into the essential tools you'll use daily to squash bugs and fine-tune performance. Finally, we’ll touch on automating your build process to set you up for consistent, stress-free deployments.
Your React Native app is built to be versatile, so testing it across different platforms is a massive part of the daily development loop. Getting this workflow dialed in will save you countless hours down the road.
pnpm ios. Expo will handle the rest, building your app and firing it up in the default iOS Simulator.pnpm android from your project folder to get the app installed and launched.pnpm web, and it will spin up a dev server and open your app in a new browser tab. It's incredibly handy for rapid UI testing.If you hit a snag, it's almost always related to the native toolchains. For example, that classic "SDK location not found" error on Android? It usually just means you need to set the ANDROID_HOME environment variable. On the iOS side of things, a quick cd ios followed by pod install often resolves weird dependency issues.
Let's be real: writing code is only half the battle. Finding and fixing bugs is the other half. While a simple console.log can get you out of a quick jam, you'll need something much more powerful for serious debugging.
Enter Flipper. It’s an open-source debugging platform from Meta, and honestly, it’s an indispensable part of any professional React Native workflow. It's a desktop app that gives you a whole suite of tools to inspect your running app.
By integrating Flipper into your process early on, you turn debugging from a guessing game into a systematic process. It lets you see the internal mechanics of your app, not just the surface, which is absolutely key for tackling complex bugs and performance bottlenecks.
Even seasoned developers hit roadblocks during setup. It's just part of the process. I've pulled together a quick table of the most common issues I see and how to get past them without pulling your hair out.
| Common Pitfall | Why It Happens | How to Fix It |
|---|---|---|
| "Command not found: pnpm" | pnpm isn't installed globally on your system, or its installation path isn't in your shell's PATH variable. |
Install it globally by running npm install -g pnpm. If it's already installed, check your PATH configuration. |
| "SDK location not found" | The Android development environment can't locate the Android SDK, usually because the ANDROID_HOME variable is missing. |
Open your .zshrc or .bash_profile and add export ANDROID_HOME=~/Library/Android/sdk (or your specific SDK path). Restart your terminal. |
| iOS pod install fails | Native dependencies are out of sync, or there are compatibility issues between pod versions. | Navigate to the ios directory (cd ios) and run pod install --repo-update to fetch the latest pod specs and reinstall. |
| Emulator/Simulator won't start | System resources are low, the emulator image is corrupted, or there's an issue with the native tooling (Xcode/Android Studio). | Try a "Cold Boot" in Android Studio's AVD Manager or "Erase All Content and Settings" on the iOS Simulator. Failing that, recreate it. |
Remembering these common fixes can save you hours of frustration and get you back to what matters: building your app.
As you get closer to launch, manually creating builds for the App Store and Google Play gets old—fast. It's tedious, error-prone, and a total momentum killer. This is exactly what Continuous Integration (CI) was made for. A good CI pipeline automates building, testing, and even deploying your app, making every release consistent and reliable.
For React Native, there are two fantastic options: Expo Application Services (EAS) Build and GitHub Actions.
EAS Build is a hosted service from the Expo team that's tailor-made for React Native. It handles all the gnarly parts of setting up build environments, managing signing credentials, and submitting to the app stores. It’s hands-down the fastest way to get a submittable binary from your code.
On the other hand, GitHub Actions offers more granular control. You can write custom workflows right inside your repo to build your app on virtual machines. This is a great choice if you have complex build steps or want to run other checks, like linters or unit tests, before a build kicks off. A simple workflow could trigger a new build on every push to your main branch, ensuring you always have a fresh, deployable version of your app at the ready.
Diving into a new React Native setup always kicks up a few questions. It doesn't matter if you're a seasoned pro or just getting your feet wet; these are the decisions that shape your project's foundation. Getting them right from the start saves you from some serious headaches down the line.
We get these questions all the time. Here are the straight-up, practical answers we give our fellow developers to help you build on solid ground.
Yes. Full stop. This is the big one. Think of it this way: React Native isn't a new language; it's a framework that lets you use your React skills to build for mobile. Trying to learn both at once is like learning to run before you can walk. You’re just setting yourself up for a frustrating time.
To have a smooth go of it, you need a solid handle on core React concepts.
useState and useEffect should feel like second nature.Nail down React first. Then, you can pour all your energy into the fun stuff: React Native's mobile-specific components, navigation, and native APIs. The learning curve will feel so much more manageable.
You absolutely can. This is a well-trodden path for apps that start simple and grow into something more complex. Expo has a command to "eject" your project, which spits out the native ios and android folders and essentially converts your project into the Bare workflow. Just like that, you have full native control.
But here’s the catch: ejecting is a one-way trip. Once you go Bare, you can't go back to the managed workflow. It’s a major move, usually triggered when you hit a wall and need a custom native module that just won't play nice with Expo's managed environment.
Ejecting is a great escape hatch to have, but it adds a new layer of complexity. It's always better to think about your project's long-term needs upfront. Choosing the right workflow from day one can save you from a major architectural shift later on.
Honestly, for a simple, single-purpose app, a monorepo can feel like bringing a bazooka to a knife fight. If you're just building one app and don't have any grand plans for sharing code, a standard project structure is perfectly fine. It'll get you up and running faster.
The real magic of a monorepo comes when you start thinking about the future. If you can see any of these scenarios on the horizon, starting with a pnpm monorepo is a brilliant strategic move:
Setting up this structure from the beginning creates a scalable foundation. It's the kind of decision that saves you from a massive, painful refactor down the road.
Great question. This gets right to the heart of how styling works in React Native. In short, NativeWind is what makes the magic of Tailwind CSS possible in a non-web world.
Your standard Tailwind CSS is built for the browser. It scans your HTML files, finds all the utility classes, and generates a CSS file. But React Native doesn't use HTML or CSS, so that whole process is a non-starter.
NativeWind acts as the bridge. During the build process, it scans your components, finds all your Tailwind classes, and translates them into React Native's native StyleSheet objects on the fly. You get the incredible developer experience and speed of Tailwind, but the output is performant, native styling. It's the best of both worlds.
Ready to skip the setup and start building immediately? theappmarket offers a massive catalog of production-ready React Native templates built with Expo, TypeScript, and NativeWind. Get full source code and a scalable foundation for your next app. Explore our templates at theappmarket.io.

Dec 08, 2025
4 min read
android login with facebook: Learn to set up the Facebook SDK, manage tokens, and implement secure authentication across native Android, cross-platform apps.

Dec 07, 2025
4 min read
Master the alert in React Native. Learn to handle platform differences, build custom modals, and apply best practices for a seamless user experience.
Dec 06, 2025
4 min read
keyboardavoidingview react native: Master keyboard handling with KeyboardAvoidingView across iOS, Android, Expo, and TypeScript.

Dec 05, 2025
4 min read
A practical guide to implementing a React Native PDF viewer. Learn to compare libraries, handle native setup, and troubleshoot common issues with real code.

Dec 04, 2025
4 min read
how to validate startup idea: learn proven methods like customer interviews, MVPs, and metrics to confirm market fit.

Dec 03, 2025
4 min read
how to make app like uber: Learn core features, tech stack, development steps, testing, and launch tips.

Dec 01, 2025
4 min read
A practical guide to Stripe React Native integration. Learn to set up your server, build payment UIs, handle webhooks, and launch secure mobile payments.

Nov 30, 2025
4 min read
Learn how to master push notifications in React Native. This guide covers setup, best practices, and advanced techniques for engaging your users.

Nov 29, 2025
4 min read
Build powerful location-based apps with our practical guide to react native with google maps. Get setup guides, pro tips, and best practices for iOS & Android.

Nov 28, 2025
4 min read
Explore deep linking react native with a practical guide to configuring URL schemes, universal links, navigation, and testing for Expo and bare apps.

Nov 28, 2025
4 min read
A practical guide to building a scalable React Native design system. Learn to implement tokens, theming, and tools like NativeWind and gluestack-ui.
Nov 26, 2025
4 min read
Learn why react native expo templates speed up your projects with ready-made patterns and practical tips.

Nov 25, 2025
4 min read
Discover how to improve developer productivity with actionable strategies for workflow, tooling, and culture. A practical guide for software engineering teams.

Nov 24, 2025
4 min read
Discover the best cross platform app development tools. Compare top frameworks like Flutter and React Native to build and ship apps faster.
Nov 23, 2025
4 min read
This Expo React Native tutorial provides a hands-on guide to building cross-platform apps. Learn setup, styling with NativeWind, navigation, and deployment.

Nov 22, 2025
4 min read
Build beautiful UIs faster with this guide to Tailwind CSS React Native. Learn setup, styling, and advanced techniques with NativeWind for mobile apps.

Nov 21, 2025
4 min read
Explore our curated list of 7 top-tier React Native app examples. Discover production-ready templates and resources to build your next app faster.

Mar 19, 2025
4 min read
theappmarket offers React Native UI templates to accelerate development. Get customizable, production-ready React Native app templates and Ui kit, some free. Build faster & smarter today!