Rapid Friday Sale is Live!
Get exclusive discounts on all products
Nov 28, 2025

4 min read

Ever clicked a link that magically opened an app and took you right to a specific screen? That’s deep linking, and it’s the secret sauce that connects your React Native app directly to the world outside it. Instead of just landing users on your home screen, you can guide them straight to a product page, a chat, or a specific piece of content.
This isn't just a nice-to-have feature; it’s a critical piece of the puzzle for turning a static app into a dynamic, integrated part of a user's digital life. It allows marketing campaigns, notifications, and web content to flow seamlessly into your app, which is a massive win for user engagement.
In a packed app market, creating a smooth, frictionless path for your users is everything. Deep linking is the bridge between the wider web and the valuable content tucked away inside your app. Without it, you’re forcing users to do the heavy lifting—opening the app, searching, and navigating on their own. That friction almost always leads to people dropping off.
Imagine a user clicks an email promotion for a specific product. A deep link takes them directly to that product page. No hunting, no frustration.
This direct path is a game-changer for developers and marketers. It’s a powerful tool for:
There's a reason 38% of mobile developers now use React Native. The framework has incredibly robust support for features like this, making it a go-to for modern app strategies.
The core idea is simple: reduce the number of taps. Every single tap you save a user is a victory for their experience. A well-implemented deep link feels like magic, making your app feel like a natural extension of whatever they were just doing.
For React Native, there are two primary ways to get this done: the old-school URL Schemes (like myapp://) and the more modern Universal Links (for iOS) or App Links (for Android), which use standard https:// URLs.
Choosing the right method (or combination of methods) is crucial. Here's a quick breakdown to help you decide what's best for your project.
| Feature | URL Schemes (e.g., myapp://) | Universal Links / App Links |
|---|---|---|
| URL Format | Custom, non-standard (e.g., yourapp://profile/123) |
Standard web URLs (e.g., https://yourdomain.com/profile/123) |
| Fallback Behavior | Fails silently if the app isn't installed. | Falls back to your website in a browser if the app isn't installed. |
| Security | Less secure; multiple apps can claim the same scheme. | Highly secure; requires a verified association with your domain. |
| Setup Complexity | Relatively simple to configure in-app. | More complex; requires server-side configuration (AASA file). |
| Best For | Internal app-to-app communication or simple linking needs. | Web-to-app user journeys, marketing campaigns, and sharing. |
We see many of the top-tier React Native app examples using a combination of these methods to create truly intuitive user flows. Understanding when and where to use each one is key to building a professional and seamless application.
Before your app can magically whisk users away to a specific screen, it needs to learn how to listen. The initial project setup is where you lay all the groundwork for a solid deep linking react native implementation. Think of it as telling iOS and Android, "Hey, when you see a link that looks like this, it belongs to my app. Send it over."
This process looks a little different depending on whether you're in an Expo-managed workflow or a bare React Native project, but the end goal is identical. You're registering a custom URL scheme that acts as your app's unique address on the device.
I've seen many developers trip up here by forgetting to rebuild their native app after making these changes. If you don't rebuild, the new configuration simply won't get applied, and you'll be left scratching your head wondering why it's not working.
This diagram shows the seamless user journey you're aiming for. A single click should take a user from a link, right into your app, directly to the content they wanted.
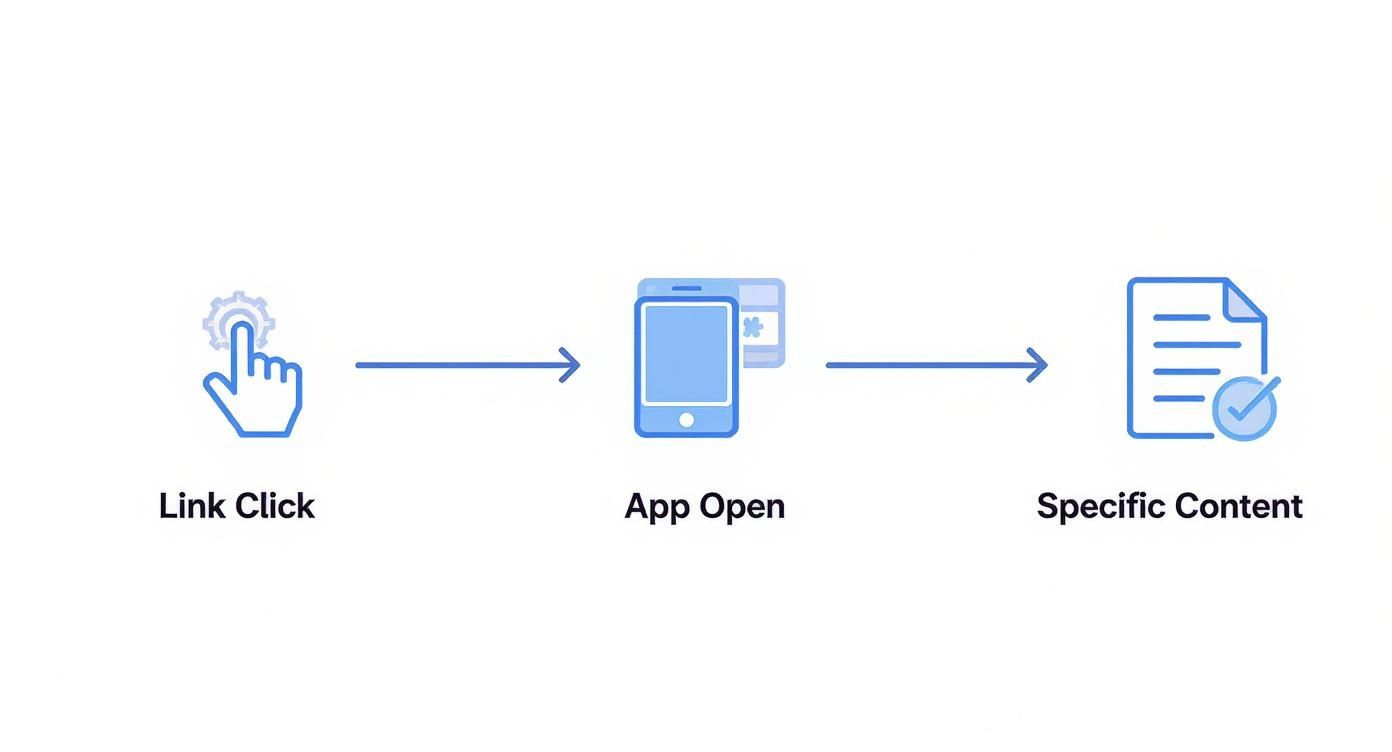
Getting this initial setup right is non-negotiable. If it's misconfigured, the whole chain breaks before it even begins.
If you're building with Expo, you're in luck—the setup is handled cleanly right inside your project configuration file. You won't have to touch any native code directly, which is one of the biggest draws of the Expo ecosystem. All you have to do is add a scheme property to your app.config.js or app.json.
For example, if you want to register the scheme myapp, your config will look something like this:
// app.config.js or app.json export default { expo: { name: 'MyAwesomeApp', slug: 'my-awesome-app', scheme: 'myapp' // This is the line that does the magic }, };
And that's literally it. When you build your project, Expo takes that scheme and automatically plugs it into the necessary native files (Info.plist for iOS and AndroidManifest.xml for Android). Developers who start with one of the many available React Native Expo templates find this streamlined process saves a ton of time and potential headaches.
For those of us working in bare React Native projects, it's time to get our hands a little dirty and edit the native files directly. On the iOS side, this means we need to modify the Info.plist file, which you'll find in the ios/[YourProjectName] directory.
You'll be adding a new URL type to declare your app's custom scheme.
myapp.This simple action registers myapp:// with the operating system. Now, iOS knows that any link starting with this prefix should be handed off to your application.
Over on the Android side of things, the configuration happens inside the AndroidManifest.xml file. You can find it at android/app/src/main/AndroidManifest.xml. Here, you need to add an <intent-filter> to your app's main activity.
This filter is what tells the Android OS what kind of "intents"—in our case, a link click—your activity is capable of handling.
Crucial Tip: Make absolutely sure you place this intent filter within the
<activity>tag that has theandroid:name=".MainActivity"attribute. I’ve seen this misplaced countless times, and it’s a common bug that can be surprisingly tricky to track down.
Here’s the snippet you need to add inside that main <activity> tag:
With these changes made, your app is now officially configured to intercept deep links. The next piece of the puzzle is writing the JavaScript code to actually handle them when they arrive.
Alright, you've got your app configured to catch incoming URLs. Now for the fun part: making those links actually do something. This is where React Navigation steps in as the central nervous system for your entire deep linking setup.
Think of it this way: without this piece, the native side hears the link, but the React Native side has no idea what to do with it. Your app might open, but it'll just sit there on the home screen, which completely defeats the purpose of creating that seamless user journey.
What we're aiming for is a clear, declarative map. You need to tell your app, "Hey, when you see a link like myapp://products/123, I want you to open the ProductDetails screen and pass { id: '123' } as a parameter." This mapping is what transforms a simple URL into a dynamic, context-aware experience.

The heart of this entire process is the linking object that you pass straight to your NavigationContainer. This object is surprisingly simple and boils down to two key properties: prefixes and config.
prefixes: This is just an array of the URL schemes and domains your app should listen for. It’ll include your custom schemes (like myapp://) and any universal link domains you've set up (https://yourapp.com).config: This is where the magic happens. It’s an object that maps URL path patterns directly to your navigator's screens.Let’s sketch this out for a simple e-commerce app. Here’s a practical example of what that linking configuration might look like.
import { NavigationContainer } from '@react-navigation/native';
const linkingConfig = { prefixes: ['myapp://', 'https://shop.myapp.com'], config: { screens: { Home: 'home', Profile: 'user/profile', ProductDetails: 'products/:id', NotFound: '*', // This is a handy catch-all for any unmatched paths }, }, };
function App() { return ( <NavigationContainer linking={linkingConfig}> {/* Your Stack Navigator and Screens Go Here */} </NavigationContainer> ); }
Notice that products/:id path? That's a dynamic segment. React Navigation is smart enough to parse whatever value comes after products/ and pass it as a route parameter to the ProductDetails screen. It’s incredibly powerful for directing users to specific items, blog posts, or user profiles.
One crucial detail that often gets overlooked is how your app behaves in different states. The user experience needs to feel consistent whether the app is completely closed or just chilling in the background.
linking config to build the entire navigation stack from scratch. For a link to a product page, it might automatically place the Home screen in the stack first. That way, when the user hits the back button, they land somewhere familiar instead of exiting the app.linking config will just push the new screen onto the existing navigation stack, creating a smooth and intuitive transition.React Native's state persistence can really level this up by letting the navigation state survive app restarts, keeping the user's context intact. Honestly, the framework's deep linking tools are a huge reason development costs can be cut by up to 40% compared to building natively.
Getting this configuration just right is absolutely essential. Our comprehensive Expo React Native tutorial walks through more hands-on examples for structuring your navigators and screens. Once this mapping is in place, you've successfully bridged the gap between native link handling and your app's UI, creating a truly connected experience.
While custom URL schemes are a decent starting point for deep linking react native, they're not what you want in a production app. For a truly professional, secure, and seamless user experience, you need to step up to Universal Links on iOS and App Links on Android.
These aren't some weird custom protocol. They’re standard https:// URLs, and that one difference is a massive leap forward.
The biggest win? No more annoying pop-ups. Unlike a URL scheme that often asks the user, "Open in App?", Universal and App Links just work. They open your app instantly and directly. It feels clean, professional, and trustworthy. Even more important, they plug a huge security hole by creating a verified, unbreakable link between your domain and your app. No more worries about a malicious app trying to hijack your links.

To make this magic happen, you have to prove you actually own the domain the links are coming from. This is done by hosting a special JSON file on your server that acts as a digital handshake between your website and your app.
It's a non-negotiable step, and each platform has its own file requirement:
apple-app-site-association (and no, that's not a typo—it has no .json extension).assetlinks.json.You have to place these files in a specific spot: a .well-known directory at the root of your domain. They also must be served over HTTPS. So, for example, your iOS file would live at https://yourdomain.com/.well-known/apple-app-site-association. If this file isn't there and publicly accessible, the whole system falls apart.
Think of it this way: These files are a public declaration. You're telling Apple and Google, "I own this domain, and I officially authorize my mobile app to handle links that match these patterns." This secure association is what makes this approach so much better than basic URL schemes.
Once your server is set up, it's time to tell your iOS project which domains it should listen to. This is all done right inside Xcode.
First, you need to add the "Associated Domains" capability to your app. In Xcode, just open your project, select your app's target, and head over to the Signing & Capabilities tab. Hit the + Capability button and find Associated Domains in the list.
Now you can add the domains you want your app to handle. Make sure you prefix each domain with applinks:. For instance, you’d add applinks:www.yourdomain.com. This little line tells iOS that on installation, it needs to go fetch the apple-app-site-association file from that domain to verify that you really do own it.
Over on the Android side, we're heading back to the AndroidManifest.xml file, just like we did for the custom URL scheme. The setup for App Links is similar but includes one crucial addition.
Inside your <intent-filter>, you need to add android:autoVerify="true". This single attribute is what tells the Android OS to go look for your assetlinks.json file on the domains you've listed.
Here’s a quick look at how your intent filter should be structured:
When a user clicks a link to https://www.yourdomain.com, this setup prompts Android to check for your verification file. If it finds it and everything checks out, your app opens immediately. No chooser dialog, no "Open with..." prompt. Just a fast, secure, and perfectly integrated journey from the web straight into your app.
A feature isn't really finished until you've put it through its paces. For deep linking in React Native, that means actually simulating link clicks and digging into native logs to find problems before your users do. Just crossing your fingers and hoping it works after deployment is a recipe for a terrible user experience.
The good news is you don't have to push a new build every single time you want to test a link. Both iOS and Android give you some powerful command-line tools that let you trigger a deep link right in your simulator or on a plugged-in device. Honestly, this is a massive time-saver during development.
If you're testing your URL schemes or Universal Links on iOS, you'll want to get familiar with the xcrun simctl command. This little utility talks directly to the iOS simulator, letting you "open" a URL just as if a user tapped on it.
For an iOS simulator, the command looks like this:
xcrun simctl openurl booted "myapp://products/123"
Over on the Android side, the equivalent tool is the trusty Android Debug Bridge (adb). The command is structured a bit differently, but the result is the same—it sends an intent to the OS, telling it to open your app with a specific URI.
For an Android emulator or a connected device:
adb shell am start -W -a android.intent.action.VIEW -d "myapp://products/123" com.yourpackagename
Using these commands lets you quickly fire off different paths and parameters without the painfully slow cycle of rebuilding and deploying your entire app.
Even with a perfect setup, things can still go sideways. If your links aren't opening the app at all, or maybe the parameters just aren't coming through correctly, your first stop should always be the native logs.
adb logcat in your terminal to see a live stream of device logs. Filter by your app's package name to see if the incoming intent is even being received and how it's being processed.When it comes to Universal Links, a classic point of failure is the server-side setup. Apple provides an official validator tool to check your
apple-app-site-associationfile. Always, always run your domain through it to make sure it's properly formatted and being served correctly.
Don't forget that performance is a huge part of the user experience, too. Making sure your screens load quickly, maybe by lazy loading them, keeps the navigation feeling snappy. The high developer satisfaction with different frameworks like React Native is often tied to these kinds of capabilities, which let us build complex but smooth-as-butter app flows.
As you start weaving deep links into your React Native app, you'll inevitably run into a few tricky situations. These are the kinds of "what if" scenarios that almost everyone faces. Getting them right is what separates a clunky user experience from a smooth, intuitive one. Let's walk through a few of the most common hurdles I've seen developers stumble over.
The big one? Handling links that point to something behind a login wall. What’s supposed to happen when a logged-out user clicks a link to, say, their private profile screen?
This is a classic deep linking react native challenge, and how you solve it has a huge impact on user experience. You absolutely don't want to just dump the user on the protected screen and watch it fail. The trick is to guide them through the login process without losing their original destination.
The best approach is to create an intermediary "resolver" screen that first checks the user's authentication status.
Here's the critical part: after they successfully log in, your app needs to remember where they were originally trying to go and complete that navigation. This preserves their intent and makes the whole process feel seamless.
The goal is to gracefully handle the auth check without losing the context of the user's original click. Storing the initial URL and redirecting after login is the most reliable way to achieve this.
This question usually comes up when you start thinking about marketing campaigns or sharing features. While standard deep links are fantastic, they have one glaring weakness: they only work if the user already has your app installed. If they don't, the link just goes nowhere, which is a terrible experience.
This is exactly the problem Firebase Dynamic Links were built to solve. Think of them as "smarter" URLs that can actually survive the app installation process.
When someone clicks a Dynamic Link, it checks if the app is installed. If not, it intelligently routes them to the right place—the Apple App Store or Google Play Store. Once the user installs and opens the app for the very first time, your code can retrieve the original link data. This makes them perfect for any scenario where you can't assume every user is already on board.
Yes, and you probably should! Setting up multiple URL schemes is a common practice, especially for managing different app environments. For instance, you could use myapp-dev:// for your development builds and reserve myapp:// for the production version that goes out to users.
Getting this set up is surprisingly straightforward:
app.config.js file, you just define an array of schemes instead of a single string. For example: scheme: ['myapp', 'myapp-dev'].Info.plist. On the Android side, you just add multiple <data> tags within the same intent filter in your AndroidManifest.xml.This simple separation helps keep your development and production logic clean and prevents any messy crossovers while you're testing.
Ready to skip the configuration headaches and launch faster? theappmarket provides production-ready React Native templates with deep linking and navigation pre-configured. Explore our catalog and find the perfect starter for your next project.

Dec 08, 2025
4 min read
android login with facebook: Learn to set up the Facebook SDK, manage tokens, and implement secure authentication across native Android, cross-platform apps.
Dec 07, 2025
4 min read
Master the alert in React Native. Learn to handle platform differences, build custom modals, and apply best practices for a seamless user experience.
Dec 06, 2025
4 min read
keyboardavoidingview react native: Master keyboard handling with KeyboardAvoidingView across iOS, Android, Expo, and TypeScript.

Dec 05, 2025
4 min read
A practical guide to implementing a React Native PDF viewer. Learn to compare libraries, handle native setup, and troubleshoot common issues with real code.

Dec 04, 2025
4 min read
how to validate startup idea: learn proven methods like customer interviews, MVPs, and metrics to confirm market fit.
Dec 03, 2025
4 min read
how to make app like uber: Learn core features, tech stack, development steps, testing, and launch tips.

Dec 02, 2025
4 min read
Build a rock-solid React Native setup. This guide covers Expo vs. Bare workflows, TypeScript, pnpm monorepos, NativeWind, and deployment strategies.
Dec 01, 2025
4 min read
A practical guide to Stripe React Native integration. Learn to set up your server, build payment UIs, handle webhooks, and launch secure mobile payments.
Nov 30, 2025
4 min read
Learn how to master push notifications in React Native. This guide covers setup, best practices, and advanced techniques for engaging your users.

Nov 29, 2025
4 min read
Build powerful location-based apps with our practical guide to react native with google maps. Get setup guides, pro tips, and best practices for iOS & Android.

Nov 28, 2025
4 min read
A practical guide to building a scalable React Native design system. Learn to implement tokens, theming, and tools like NativeWind and gluestack-ui.

Nov 26, 2025
4 min read
Learn why react native expo templates speed up your projects with ready-made patterns and practical tips.

Nov 25, 2025
4 min read
Discover how to improve developer productivity with actionable strategies for workflow, tooling, and culture. A practical guide for software engineering teams.

Nov 24, 2025
4 min read
Discover the best cross platform app development tools. Compare top frameworks like Flutter and React Native to build and ship apps faster.
Nov 23, 2025
4 min read
This Expo React Native tutorial provides a hands-on guide to building cross-platform apps. Learn setup, styling with NativeWind, navigation, and deployment.
Nov 22, 2025
4 min read
Build beautiful UIs faster with this guide to Tailwind CSS React Native. Learn setup, styling, and advanced techniques with NativeWind for mobile apps.

Nov 21, 2025
4 min read
Explore our curated list of 7 top-tier React Native app examples. Discover production-ready templates and resources to build your next app faster.
Mar 19, 2025
4 min read
theappmarket offers React Native UI templates to accelerate development. Get customizable, production-ready React Native app templates and Ui kit, some free. Build faster & smarter today!