Rapid Friday Sale is Live!
Get exclusive discounts on all products
Nov 30, 2025

4 min read

Implementing push notifications in React Native is one of the most effective ways to boost user engagement and keep people coming back. It’s your direct line to the user, letting you speak to them even when your app is closed. This usually means plugging into services like Firebase Cloud Messaging (FCM) for Android and the Apple Push Notification service (APNs) for iOS to get those timely, relevant messages delivered.
Before we get our hands dirty with code, let's talk about why a solid push notification strategy is such a big deal for your React Native app. These aren't just simple pop-up alerts; they're a powerful tool for turning casual users into loyal fans. When done right, they can have a massive impact on your key business metrics.
A well-timed notification can bring a dormant user back from the brink, announce an awesome new feature, or drive sales with a special offer. Think about an e-commerce app reminding you about an abandoned cart—we've all been there. Or a fitness app sending a little "you can do it!" message to get you moving. These small interactions build a real relationship with your audience. You'll notice that many of the most successful apps highlighted in collections of React Native app examples lean heavily on this tactic to keep engagement high.
One of the first hurdles you'll encounter is the stark difference in how iOS and Android handle permissions for notifications. This isn't just a technical detail; it directly shapes your strategy and how many users you can actually reach.
Android has historically been pretty lenient, granting notification permissions by default when a user installs your app. This leads to incredibly high opt-in rates. Apple, on the other hand, makes you work for it. iOS requires an explicit opt-in from the user via a system prompt that’s all too easy to dismiss.
The numbers tell the whole story. Data shows a massive gap: Android users have an opt-in rate of 91.1%, while for iOS users, it's a much more modest 43.9%. This is a direct result of Apple's privacy-first approach, which forces you, the developer, to prove the value of your notifications before a user gives you the green light. You can dive deeper into these engagement metrics over at CodePushGo.
Key Takeaway: Don't treat the iOS permission prompt as an afterthought. You really only get one shot to make a good first impression. Your prompt needs to clearly explain the benefits—whether it's exclusive offers, important updates, or personalized content—to convince users to say "yes."
Ultimately, the time and effort you pour into building a great notification system pay real dividends. It’s not just about blasting out messages; it’s about creating meaningful touchpoints that genuinely improve the user experience and help you hit your business goals.
Let's break down how a well-implemented push notification strategy can impact your app's performance.
| Metric | Impact of Effective Push Notifications | Example Scenario |
|---|---|---|
| User Retention | Significantly reduces churn by keeping the app top-of-mind. | A language-learning app sends a daily "word of the day" to encourage consistent practice. |
| Engagement | Increases the frequency and duration of user sessions. | A news app alerts users to breaking stories relevant to their interests, pulling them back in. |
| Conversion Rates | Drives direct action, from purchases to content consumption. | An e-commerce app sends a "price drop" alert for an item the user previously viewed. |
| User Lifetime Value (LTV) | Boosts LTV by fostering a long-term relationship and repeat interactions. | A gaming app notifies users about new levels or special in-game events, keeping them invested. |
By understanding these principles, you're ready to build a notification system that doesn't just work on a technical level but also delivers real, tangible value to both your users and your bottom line.
Alright, let's dive into one of the first big decisions you'll make when building push notifications in React Native: choosing between the Expo managed workflow and a bare React Native setup. This isn't just a minor technical detail—it’s a foundational choice that will shape your entire development process, from how fast you can move to how much control you have over the native code.
Getting this right from the start can save you a world of hurt later on. The whole thing boils down to a classic trade-off: convenience versus control. Are you trying to ship an app quickly with minimal fuss, or does your project demand deep, granular access to the underlying iOS and Android platforms?
Your main goal for using notifications in the first place often points you in the right direction. This little decision tree shows how your objective, whether it's boosting user engagement or driving sales, can influence your strategy.
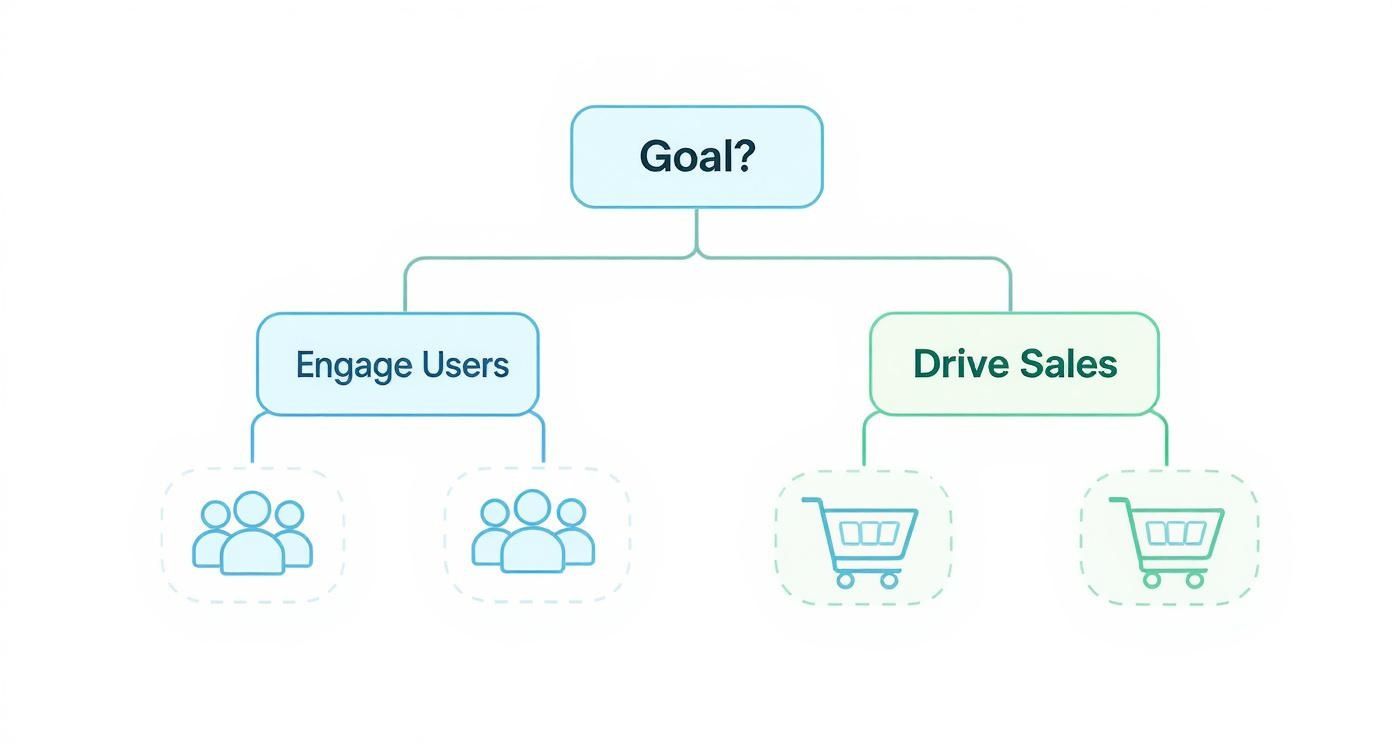
As you can see, different goals lead to different tactics, and the complexity of those tactics can nudge you toward one workflow over the other.
Expo gives you a managed environment that hides away most of the messy native configuration. I like to think of it as a set of guardrails that handles the really tricky parts of mobile development for you. When it comes to push notifications, this is a huge win, especially if your team doesn't have a ton of experience with native iOS or Android development.
With Expo, you can get notifications up and running without ever needing to open Xcode or Android Studio. Tools like Expo Application Services (EAS) and the expo-notifications library offer a single JavaScript API to manage everything—from asking for permissions to handling alerts on both platforms. It’s a super streamlined approach that lets you stay focused on your React Native code.
If your main goal is speed and you don't anticipate needing any custom native modules, the Expo managed workflow is a fantastic choice. It cuts down setup time dramatically and makes the whole notification process way simpler.
But, of course, there's a trade-off. While Expo is great for most common scenarios, you might hit a ceiling if you need a specific native library that isn’t supported in the managed workflow. Before you commit, it's always smart to double-check that any third-party packages you need are compatible. If you want to get a better feel for building with it, checking out a solid Expo React Native tutorial is a good next step.
Going with a bare React Native project means you have total, unrestricted access to the native code. This is the traditional route, where you're directly managing the Xcode and Android projects right alongside your JavaScript. It definitely requires more setup and some platform-specific know-how, but the flexibility it offers is unmatched.
This is the path you'll need to take when you have to:
Choosing this path puts you in the driver's seat for managing native dependencies, build settings, and platform updates. It's a heavier lift, no doubt, but the payoff is complete control over what your app can do. You’ll never be limited by the constraints of a managed system.
Now that you’ve sorted out your workflow, it's time to build the engine that will actually power your push notifications in React Native.
For the vast majority of projects, the clear winner here is Firebase Cloud Messaging (FCM). It’s a robust, scalable, and free service from Google that acts as the central hub for sending messages to both Android and iOS devices.
Think of FCM as the dedicated mail carrier for your app. Your server doesn't have to figure out the specific address of every single device out there. Instead, you just hand your messages off to FCM, and it handles all the complex logistics of getting them to the right users, whether they're on an iPhone or an Android.
https://www.youtube.com/embed/q6TL2RyysV4
This approach saves an incredible amount of development time and infrastructure cost. You get to focus on crafting great notifications, while Firebase manages the entire delivery pipeline. The tech behind push notifications in React Native has come a long way, with FCM really cementing itself as the industry standard, especially for Android.
The combination of Firebase with a library like Notifee is pretty much the most powerful stack you can get for rich, interactive notifications in React Native. It lets you customize everything from delivery to how the user interacts with the notification. You can find more great insights about this powerful combination on vinova.sg.
First things first, head over to the Firebase console and create a new project. It’s a pretty simple process—just give your project a name and you're off. You can opt to enable Google Analytics, which is a good idea for tracking notification engagement later on, but it isn't a must-have for the initial setup.
Once your project is ready, you’ll land on the project dashboard. This is your command center for all things Firebase. From here, you’ll need to register your Android and iOS apps to link them up.
This diagram from the official docs shows how FCM sits in the middle, delivering messages from your server to user devices.
The main thing to notice is that FCM acts as a universal bridge. It dramatically simplifies the backend logic you'd otherwise have to write to talk to both Apple's and Android's separate messaging services.
Adding your Android app is a critical step. Firebase needs a way to identify your specific application to route messages correctly.
android/app/build.gradle file; it's the value for applicationId.google-services.json file for you. This little file is packed with all the keys and identifiers that link your app to your Firebase project. Think of it as your app's passport to the Firebase ecosystem.android/app/ directory. This is a crucial step—if the file is in the wrong spot, your app won't be able to connect to any Firebase services.build.gradle files. These pull in all the necessary libraries to handle FCM messages.Pro Tip: After messing with your Gradle files, it’s always a good idea to clean your Android build (
cd android && ./gradlew clean) before you rebuild. This can save you from some headaches caused by caching issues that sometimes pop up with new configs.
The iOS setup has a few more hoops to jump through because you need to bridge the gap between Firebase and the Apple Push Notification service (APNs). FCM doesn't actually send notifications directly to iPhones; it routes them through APNs.
Start by registering your iOS app in the Firebase console, just like you did for Android. You'll need your app's Bundle ID, which you can find in your Xcode project settings under the "General" tab. After registration, Firebase will give you a GoogleService-Info.plist file. Download it and add it to the root of your Xcode project, making sure it’s included in all your build targets.
Now for the most important part of the iOS setup: linking APNs to Firebase. You've got two options here.
.p8 key in your Apple Developer account that can be used for all of your apps. The best part? It doesn't expire, which makes it so much easier to manage long-term.To use an authentication key, go to the "Cloud Messaging" tab in your Firebase project settings. Under the "iOS app configuration" section, you’ll see an option to upload your APNs Auth Key. You'll need to provide the .p8 key file itself, your Key ID, and your Team ID—all of which you can find in your Apple Developer account.
Once that's uploaded, Firebase can securely talk to APNs on your app's behalf. And just like that, you're ready to send notifications to your iOS users.
Once your backend is wired up, the real action starts inside your React Native app. This is where you bring your notification strategy to life, listening for incoming messages and dictating exactly how your app should respond. Getting this right is the key to a seamless user experience, whether they have your app open or it's tucked away in their pocket.
The workhorse for all of this is the @react-native-firebase/messaging library. It gives you all the hooks you need to manage permissions, grab device tokens, and listen for messages across different app states.
Before you can fire off a single notification to an iOS user, you have to get their explicit permission. This is a one-time, make-or-break moment. While Android permissions are usually granted by default, iOS demands a direct opt-in, making your approach here absolutely critical.
Don't just hit them with the system dialog the second they launch the app. That's a recipe for rejection. Instead, time it strategically. Wait for a moment when the user understands the value they'll get from notifications, like right after they complete onboarding or subscribe to a topic they care about.
Here’s how you can ask for permission in practice:
import messaging from '@react-native-firebase/messaging';
async function requestUserPermission() { const authStatus = await messaging().requestPermission(); const enabled = authStatus === messaging.AuthorizationStatus.AUTHORIZED || authStatus === messaging.AuthorizationStatus.PROVISIONAL;
if (enabled) { console.log('Authorization status:', authStatus); } }
This simple function triggers the native iOS permission dialog. An AUTHORIZED status means the user gave you the green light, while PROVISIONAL is a bit more nuanced—it allows notifications to be delivered quietly to the notification center without an initial alert.
Every device that can receive push notifications has a unique token. Think of it as the device's mailing address. Your backend needs this token to tell FCM exactly where to send a message.
As soon as the user grants permission, you need to grab this token and send it over to your server. I usually store it right alongside the user's profile information.
async function getFcmToken() { const fcmToken = await messaging().getToken(); if (fcmToken) { console.log('Your Firebase Token is:', fcmToken); // Send this token to your server } else { console.log('Failed to get the token'); } }
It’s also smart to listen for token refreshes. A token can change if a user reinstalls the app or restores their device from a backup, so you need to keep your server’s records fresh. The onTokenRefresh method handles this for you automatically.
Expert Tip: Don't just fetch the token once on app startup. I make it a habit to check for the token every time the app opens from a cold start and compare it against what's on my server. This catches any weird discrepancies and ensures my notifications are always deliverable.
Your app can be in one of three states when a notification arrives: foreground, background, or quit. How you handle the message is completely dependent on which state the app is in.
Foreground State: The user is actively using your app. The system won't show a notification banner here, so it's on you to intercept the message and maybe display a custom in-app banner or update the UI.
Background State: The app is running in the background but isn't the active application. The OS handles this one and will display the notification in the system tray.
Quit State: The user has completely closed the app. Just like the background state, the system takes over and displays the notification.
The messaging().onMessage() listener is your go-to for foreground messages. It lets you grab the notification payload and create a custom, less disruptive experience for the user.
For notifications that arrive when the app is in the background or quit, messaging().onNotificationOpenedApp() is what you'll use. It detects when a user taps the notification, which is the perfect place to put your deep-linking logic and navigate them to a specific screen.
There's also a separate listener, messaging().setBackgroundMessageHandler(), which is crucial for handling "data-only" messages when the app isn't in the foreground. These are silent notifications that can trigger background tasks, like syncing data, without ever showing a UI to the user.
This table breaks down the difference between standard notification messages and data-only messages.
| Message Type | Primary Purpose | Behavior in Background | User Visibility |
|---|---|---|---|
| Notification Message | Displaying alerts to the user. | Automatically handled by the system to show a notification. | High (Visible alert) |
| Data-Only Message | Triggering background logic. | Wakes up the app to run code via the background handler. | Low (Invisible to user) |
Understanding this distinction is what separates basic notifications from advanced, powerful features. A chat app, for example, could use a data-only message to sync new messages in the background. That way, they're already loaded when the user finally opens the app. It's a much smoother experience and a great example of handling push notifications in React Native effectively.
Just sending a simple text alert is table stakes. If you really want push notifications in React Native to be a core part of how you connect with users, you've got to move beyond the basics. Advanced techniques are what turn a generic, easily-ignored notification into a compelling interaction that people actually value.
This means crafting notifications that aren't just informative but are interactive, look great, and are hyper-relevant to each person. Let's dive into how to bring these powerful features to life in your app.
A notification should be a shortcut, not a dead end. Think about it: a user taps an alert for a specific product or a message in a conversation. The last thing you want is for them to land on your app's home screen, forcing them to hunt for what they were just told about. This is exactly the problem deep linking solves.
Deep linking is all about guiding a user from the notification directly to a specific screen or piece of content inside your app. An alert for 50% off a pair of shoes should open the product page for those exact shoes. This creates a smooth, intuitive path that dramatically improves the user experience and, not surprisingly, boosts conversion rates.
To pull this off, you'll lean on a navigation library like React Navigation. The idea is to include data in your notification payload that specifies the destination route and any parameters you need, like a productId. Inside your onNotificationOpenedApp listener, you just parse that data and use it to navigate the user right where they expect to go. For a more detailed walkthrough, check out our in-depth guide on deep linking in React Native.
Let's be honest, a picture is worth a thousand words, especially in a crowded notification tray. Rich notifications let you break out of the text-only box by adding images, videos, and even interactive buttons. This makes your alerts far more engaging and actionable.
The difference in performance is huge. Data shows that rich notifications with images can see a 25% higher click rate. It’s a simple addition that makes your message stand out and gives users valuable context in an instant.
Better yet, you can add action buttons so users can respond without even opening the app. Common examples are all over the place:
With a library like Notifee, it’s surprisingly straightforward to attach media and define these actions in your notification payload. You're essentially turning a passive alert into a mini-interface for your app.
On Android, users get fine-grained control over the notifications they see, all thanks to Notification Channels. Instead of a single on/off switch for your entire app, users can decide to turn off promotional alerts while keeping crucial account updates enabled.
This is a massive win for user retention. By creating distinct channels for different types of notifications (think "Promotions," "Order Updates," "New Messages"), you empower users to tailor their experience. This makes them far less likely to just silence your app completely.
When you send a notification, you just tell Android which channel it belongs to. If the channel doesn't exist on the device yet, the OS will create it for you based on the settings you provide in your code.
Pro Tip: Don't go overboard with channels. Start with a few logical categories that map to your app's main functions. Giving users too many choices can be just as overwhelming as giving them none.
The most effective notifications are the ones that feel like they were written just for you. Personalization is so much more than just sticking a user's name in the message; it’s about tailoring the content based on their behavior, preferences, and history with your app.
The impact is well-documented. Personalized notifications that include a user's name can generate 4 times higher reaction rates. Go even further with targeting based on user behavior, and you can see triple the retention rates.
Just think of these real-world scenarios:
When you connect your notification system to your user data, you can craft messages that are genuinely helpful. You're no longer just pushing alerts; you're building a stronger relationship with your audience and driving meaningful action.
Getting push notifications right in React Native can feel like a bit of a dark art sometimes. You follow the docs, wire everything up, and… nothing. It’s a common story. I’ve seen developers spend hours chasing down weird platform behaviors or confusing token issues.
Let’s walk through some of the most frequent questions and roadblocks I see people hit, so you can sidestep that frustration.
This is easily one of the most common head-scratchers. You're trying to grab the device token from Firebase Cloud Messaging (FCM) or Apple Push Notification service (APNs) to send a notification, but all you get back is null or undefined. What gives?
Nine times out of ten, it’s a permissions issue. You simply can't get a token if the user hasn't granted permission for your app to send notifications. This is especially true on iOS. Always make sure you’ve called your requestPermission() function before you try to fetch the token.
Another culprit could be a simple misconfiguration. Double-check your google-services.json on Android or GoogleService-Info.plist on iOS. If those files are missing, outdated, or in the wrong directory, your app can't talk to Firebase properly, and you won't get a token.
Okay, so you have a token, but the notifications still aren't showing up on the device. This one can be tricky because the problem could be anywhere—your app, your backend, or the push service itself.
Here's a quick mental checklist I run through:
onMessage handler and decide how to show it to the user yourself, maybe with an in-app banner.notification and data.Here's a pro tip: Use the Firebase console to send a test message directly to a specific device token. If that message gets through, you've just confirmed the problem isn't with your app's setup or APNs/FCM. The issue is almost certainly in your backend code.
"Why does this work on Android but not iOS?" If I had a dollar for every time I've heard that...
The truth is, there's no "one-size-fits-all" solution for push notifications. The underlying native platforms are just different.
Take Android's Notification Channels, for instance. They're essential for organizing notifications on Android 8.0+ and giving users granular control, but they have no direct equivalent on iOS. On the flip side, iOS has neat features like Provisional Authorization, which lets you send "quiet" notifications without a big, scary permission prompt upfront—something Android can't do.
The key is to embrace the differences. Dig into the documentation for libraries like @react-native-firebase/messaging and Notifee. They do a great job of providing platform-specific APIs and explaining what works where. Mastering these nuances is what separates a frustrating implementation from a great one.
At theappmarket, we provide production-ready React Native templates that streamline complex features like notifications, letting you focus on building a great app. Explore our app templates and UI kits to ship your project faster.

Dec 08, 2025
4 min read
android login with facebook: Learn to set up the Facebook SDK, manage tokens, and implement secure authentication across native Android, cross-platform apps.
Dec 07, 2025
4 min read
Master the alert in React Native. Learn to handle platform differences, build custom modals, and apply best practices for a seamless user experience.
Dec 06, 2025
4 min read
keyboardavoidingview react native: Master keyboard handling with KeyboardAvoidingView across iOS, Android, Expo, and TypeScript.

Dec 05, 2025
4 min read
A practical guide to implementing a React Native PDF viewer. Learn to compare libraries, handle native setup, and troubleshoot common issues with real code.

Dec 04, 2025
4 min read
how to validate startup idea: learn proven methods like customer interviews, MVPs, and metrics to confirm market fit.

Dec 03, 2025
4 min read
how to make app like uber: Learn core features, tech stack, development steps, testing, and launch tips.

Dec 02, 2025
4 min read
Build a rock-solid React Native setup. This guide covers Expo vs. Bare workflows, TypeScript, pnpm monorepos, NativeWind, and deployment strategies.

Dec 01, 2025
4 min read
A practical guide to Stripe React Native integration. Learn to set up your server, build payment UIs, handle webhooks, and launch secure mobile payments.

Nov 29, 2025
4 min read
Build powerful location-based apps with our practical guide to react native with google maps. Get setup guides, pro tips, and best practices for iOS & Android.

Nov 28, 2025
4 min read
Explore deep linking react native with a practical guide to configuring URL schemes, universal links, navigation, and testing for Expo and bare apps.

Nov 28, 2025
4 min read
A practical guide to building a scalable React Native design system. Learn to implement tokens, theming, and tools like NativeWind and gluestack-ui.

Nov 26, 2025
4 min read
Learn why react native expo templates speed up your projects with ready-made patterns and practical tips.

Nov 25, 2025
4 min read
Discover how to improve developer productivity with actionable strategies for workflow, tooling, and culture. A practical guide for software engineering teams.

Nov 24, 2025
4 min read
Discover the best cross platform app development tools. Compare top frameworks like Flutter and React Native to build and ship apps faster.
Nov 23, 2025
4 min read
This Expo React Native tutorial provides a hands-on guide to building cross-platform apps. Learn setup, styling with NativeWind, navigation, and deployment.
Nov 22, 2025
4 min read
Build beautiful UIs faster with this guide to Tailwind CSS React Native. Learn setup, styling, and advanced techniques with NativeWind for mobile apps.

Nov 21, 2025
4 min read
Explore our curated list of 7 top-tier React Native app examples. Discover production-ready templates and resources to build your next app faster.
Mar 19, 2025
4 min read
theappmarket offers React Native UI templates to accelerate development. Get customizable, production-ready React Native app templates and Ui kit, some free. Build faster & smarter today!